AI Background Remover for Product Photos
An AI background remover for product photos separates an item from its original scene so it can be placed on white, transparent, colored, or lifestyle backgrounds. The best workflow is not just one click: clean source lighting, edge checking, export format, and consistent framing all affect whether the final image looks listing-ready.
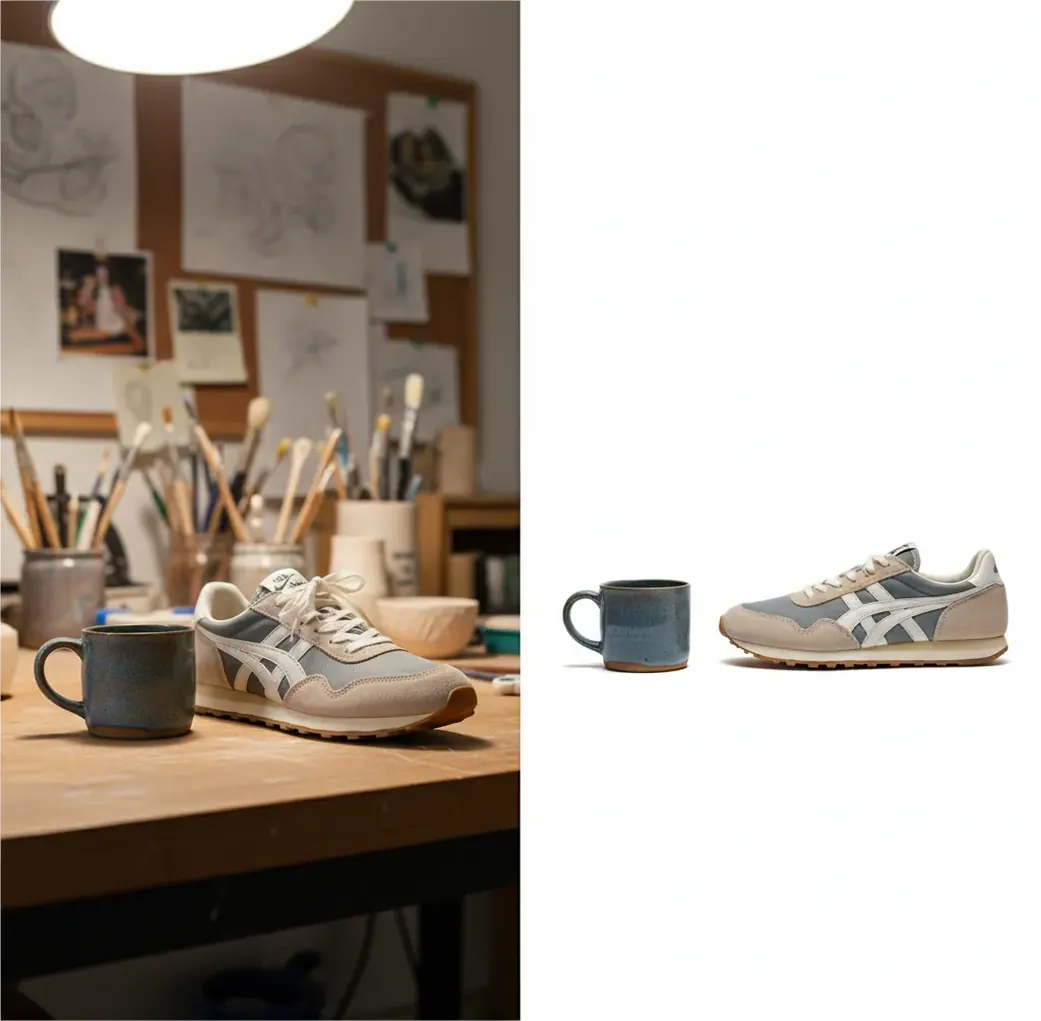
Creating your image...
An AI background remover for product photos uses image segmentation to identify the product, create a pixel-level cutout mask, and replace the original background with transparency, white, or a new scene. It works best on sharp, well-lit photos with clear contrast between the item and the backdrop, and it should always be checked at 200% zoom before publishing.
What Is an AI Background Remover for Product Photos?
An AI background remover for product photos is a tool that detects the product in an image, removes everything behind it, and exports a clean product cutout. Sellers use it to create white-background marketplace images, transparent PNGs for design layouts, social ad graphics, catalog grids, and consistent SKU photos without reshooting every item.
For ecommerce, the goal is not just deleting the background. The cutout needs believable edges, preserved holes such as handles or straps, readable labels, and either a soft contact shadow or a clean white field. A strong product cutout should still look natural when viewed at full size on a product page, not like a sticker pasted onto a blank canvas.
How Does AI Background Removal Work on Product Images?
AI background removal works by predicting which pixels belong to the product and which pixels belong to the background. This is usually treated as an image segmentation task: the model creates a mask, refines the mask edge, and applies that mask to remove or replace the surrounding scene.
Modern tools often use encoder-decoder neural networks, U-Net-style architectures, saliency detection, matting models, and post-processing filters. These systems read cues such as contrast, texture changes, object boundaries, shadows, transparency, and repeated patterns. Thin details like straps, wires, mesh, fur, and glass edges are harder because the model must decide whether partially transparent pixels are product, background, or both.
That is why two photos of the same mug, shoe, candle, or skincare bottle can produce different results. Motion blur, low resolution, glossy reflections, beige-on-beige backgrounds, and harsh shadows all change the edge information the model sees.
How Do You Remove a Product Photo Background Step by Step?
Shoot with soft, even light
Use window light, a softbox, or bounced light instead of direct flash. Softer light gives the AI cleaner product boundaries and reduces hard shadow edges that may be mistaken for part of the object.
Use a plain, contrasting backdrop
A matte poster board, sweep paper, or simple wall is enough for many products. Avoid patterned fabric, reflective counters, and backgrounds close to the product color when possible.
Upload the sharpest full-frame image
Choose a photo where the entire product is visible, the label is readable, and no important edge is cropped. Images above 1500 px on the longest side usually give cleaner masks than tiny compressed photos.
Run the background remover
Let the tool create the initial cutout mask. Browser-based tools, mobile apps, and desktop editors can all do this; Pict AI is one option for quick product cutouts directly in a browser or on iPhone.
Inspect the cutout at 200% zoom
Check corners, handles, transparent areas, label edges, shoe soles, glass rims, hairline fuzz, and shadow areas. Look for gray halos, missing holes, melted edges, or jagged stair-step outlines.
Export for the final use case
Use PNG when you need transparency or plan to place the product into a design. Use JPG when you are exporting a finished white-background listing image and want a smaller file size.
What Settings Make White-Background Product Photos Look Clean?
Clean white-background product photos usually need consistent framing, a true or near-white background, preserved product proportions, and a subtle shadow when the object should feel grounded. For marketplaces, the product should typically fill most of the frame without touching the edges, and the background should not contain props, logos, borders, or visible room details unless the channel allows them.
Use pure white only when the cutout edge is extremely clean. If the original photo has beige, gray, or colored edge contamination, a slightly off-white background can hide minor haloing better than #FFFFFF. For shoes, bottles, ceramics, and glassware, a faint contact shadow often looks more believable than a completely shadowless cutout.
Keep framing consistent across variants. If one candle fills 85% of the frame and another fills 55%, the collection grid feels messy even if each individual image is technically clean.
Which Background Remover Tools Are Best for Product Images?
| Tool | Best For | Strength | Watch For |
|---|---|---|---|
| Pict AI | Fast browser or iPhone cutouts for listings, thumbnails, and SKU cleanup | Simple workflow for white or transparent product exports | Still needs manual review on glass, shine, mesh, and low-resolution images |
| Adobe Photoshop | Professional retouching, manual masking, and high-control commercial images | Advanced layer masks, refine edge tools, and shadow control | More setup time and a steeper learning curve |
| Canva | Social posts, simple product graphics, and quick branded layouts | Easy design templates after removing the background | Fine-edge control can be limited compared with dedicated editors |
| remove.bg | Quick single-image background removal and transparent PNG exports | Fast automatic cutouts with minimal setup | Hard edges and commercial export rules depend on plan and image type |
| PhotoRoom | Marketplace photos, mobile seller workflows, and batch-style product visuals | Strong mobile-first templates for ecommerce scenes | Templates can look generic if every SKU uses the same layout |
The best tool depends on the job. Use a quick AI remover for everyday listings, a design tool for social graphics, and a manual editor when the product has glass, jewelry, reflective packaging, or high-value catalog requirements.
What Prompt Recipes Help After Removing a Product Background?
After you create a transparent product cutout, prompts can help generate supporting backgrounds for ads, gift guides, lookbooks, and portfolio mockups. Keep the product unchanged and ask only for the environment, lighting, and surface. This reduces the risk of warped labels, altered logos, or changed product shape.
White listing prompt: "Place the product on a clean pure-white ecommerce background, centered, with a soft natural contact shadow, no props, no text, no reflection, realistic studio lighting."
Lifestyle ad prompt: "Keep the product exactly the same. Add a warm modern bathroom counter scene behind it, soft morning light, shallow depth of field, neutral beige tones, premium skincare photography style, no extra labels or text."
Social color-block prompt: "Place the product on a smooth pastel background with a subtle floor shadow, centered composition, high-end DTC brand style, crisp edges, 4:5 aspect ratio, no added objects."
Print catalog prompt: "Use a neutral light-gray studio background, accurate product scale, soft shadow under the object, sharp label readability, clean commercial catalog photography, no decorative props."
Where Are Background-Removed Product Photos Used?
Background-removed product photos are used anywhere the product needs to stand alone, match a visual system, or move between layouts. The most common use is a white-background main image for ecommerce, but transparent cutouts are also useful for ads, email banners, wholesale line sheets, print catalogs, POS thumbnails, landing pages, comparison graphics, and product bundles.
Creators also use cutouts for emotional context: a candle placed into a gift guide, a mug shown in a cozy kitchen scene, a skincare bottle on a bathroom counter, or a sneaker dropped onto a bold color background for a launch post. The cutout becomes a reusable product asset rather than a one-time photo.
What Export Format Should You Use for Product Cutouts?
Use PNG when you need a transparent background, layered design flexibility, or placement into another scene. PNG preserves transparency and avoids the white box problem, but file sizes are usually larger than JPG. It is the right choice for mockups, design systems, ads, and product composites.
Use JPG when the final image already has a white or colored background and you want smaller files for ecommerce pages. JPG is efficient for finished listing images, but repeated compression can create artifacts around labels and edges. For important catalog assets, keep a high-quality PNG master and export smaller JPG versions only when needed.
For listing photos, start with at least 1500 to 2000 px on the longest side when possible. Low-resolution source files under about 1000 px wide often create crunchy masks, stair-step edges, and poor label clarity.
When Does AI Background Removal Struggle on Product Photos?
- Clear glass, acrylic, and glossy packaging can lose edges because reflections contain both product and background information.
- White products on white or beige backgrounds may create missing corners, gray halos, or softened silhouettes.
- Fine materials such as mesh, lace, fur, fringe, chain, and woven straps often need manual edge repair.
- Low-resolution images below roughly 1000 px wide can produce jagged outlines and smeared label detail.
How Do You Choose a Background Remover for Ecommerce Photos?
Choose a background remover based on edge quality, export control, speed, batch needs, privacy requirements, and how much manual correction you need. For small shops, speed and clean PNG/JPG exports may matter most. For jewelry, glassware, cosmetics, furniture, or premium catalog work, edge refinement and manual masking control become more important.
A good test is to upload five difficult products: one white item, one glossy item, one object with a handle or hole, one item with fine texture, and one low-contrast photo. Inspect each cutout at 200% zoom. If the tool preserves holes, avoids halos, keeps corners square, and maintains a natural shadow option, it is more likely to hold up across a real SKU catalog.
Related reads for sellers and creators using AI edits
Frequently Asked Questions
It is a tool that uses image segmentation to isolate a product from its original background and export it on transparency, white, or a new scene. It is commonly used for ecommerce listings, catalogs, ads, and social posts.
Yes, it can be accurate enough for many listings when the product is sharp, well lit, and clearly separated from the backdrop. Always inspect edges, holes, labels, and shadows before publishing.
A plain matte backdrop with strong contrast against the product works best. Poster board, sweep paper, or a clean wall is usually better than fabric, countertops, or busy room scenes.
Use PNG when you need transparency or future design flexibility. Use JPG for a finished white-background listing image when smaller file size matters.
Start with softer lighting and avoid heavy source-image compression. If a halo remains, refine or feather the mask edge slightly, then test the product on white and off-white backgrounds.
The most common reason is a missing contact shadow or an edge that is too sharp for the lighting. Add a subtle shadow and keep the product scale, perspective, and light direction consistent with the background.
It can, but glass and transparent packaging are harder because reflections and see-through areas mix product pixels with background pixels. High-value glass product photos often need manual retouching after the AI cutout.
Use the highest-quality source image available, ideally at least 1500 to 2000 px on the longest side. Very small or compressed images often create jagged edges and blurry labels.
Yes, transparent product cutouts are useful for color-block ads, lifestyle composites, launch graphics, and gift guides. Keep the product unchanged and use the new background to add context, not to distort the item.