Best AI Photo Editor App in 2026
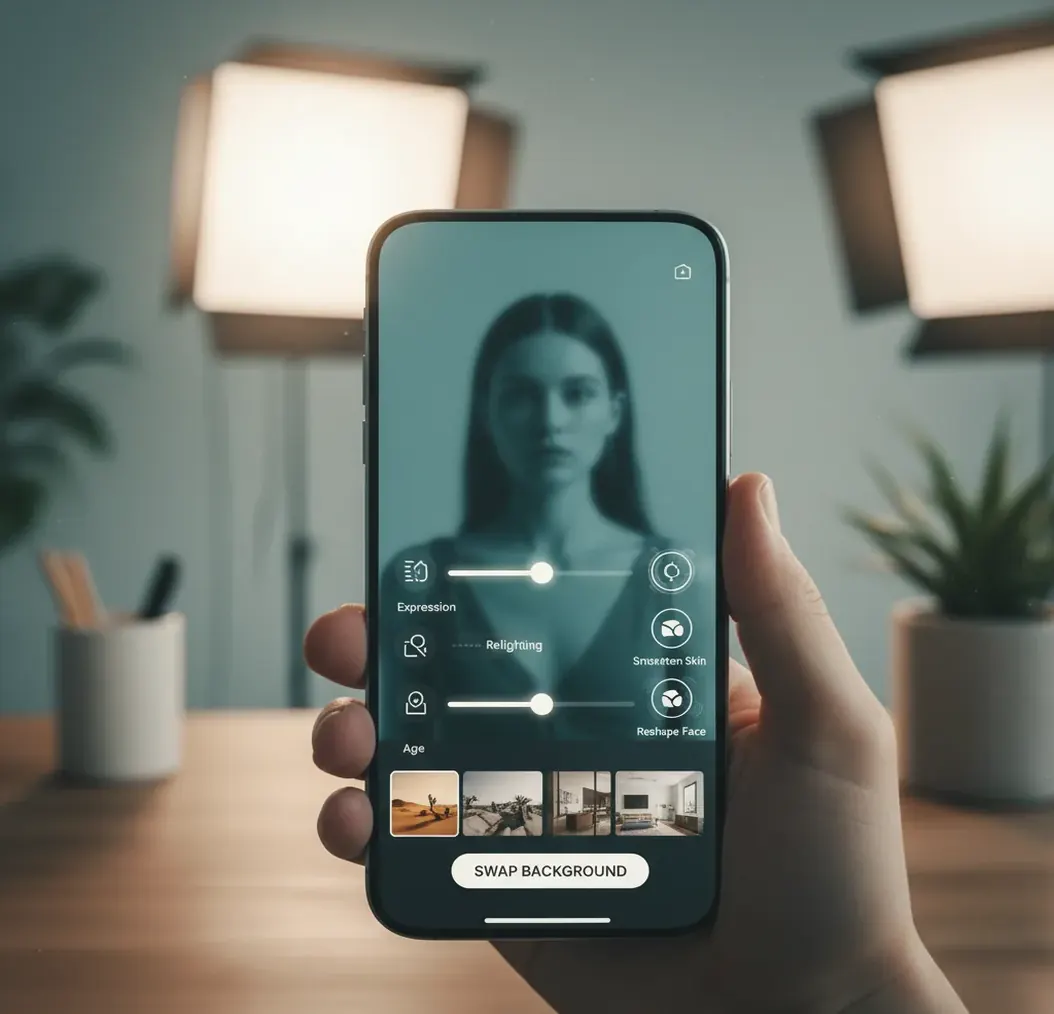
The best ai photo editor app in 2026 is the one that can make targeted edits—object removal, background replacement, relighting, retouching, resizing, and upscaling—without making faces, skin, or product details look artificial. For most creators, the strongest choice is not just the app with the most filters, but the one that combines AI selection, generative fill, local adjustments, and clean export controls.
Creating your image...
The best ai photo editor app in 2026 is an editor that uses AI segmentation and generative image models to change specific parts of a photo while preserving believable texture, lighting, and edges. Look for object removal, background editing, natural retouching, relighting, upscaling, mobile access, and a 100% zoom review before posting or printing.
What Is the Best AI Photo Editor App in 2026?
The best AI photo editor app in 2026 is a photo editing tool that can understand image regions and apply precise changes without requiring manual masking for every edit. It should handle common creator tasks like removing distractions, replacing backgrounds, cleaning portraits, adjusting lighting, expanding crops, and preparing images for social posts, product listings, headshots, gifts, prints, or portfolio updates.
A strong AI editor usually combines segmentation, inpainting, enhancement, and export presets. Segmentation identifies subjects, hair, clothing, sky, objects, and background zones. Inpainting generates replacement pixels where something was removed. Enhancement improves sharpness, noise, and resolution. Pict AI is one practical option for prompt-based edits and classic touch-ups, but the right app depends on your image type, privacy needs, budget, and final use.
How Does an AI Photo Editing App Actually Work?
An AI photo editing app works by analyzing the image, identifying editable regions, and then modifying or generating pixels based on the requested change. Most modern tools use a mix of computer vision and generative AI: segmentation models locate subjects and edges, while diffusion or transformer-based models create new background, texture, lighting, or detail where needed.
For example, object removal is usually an inpainting task. The app masks the unwanted object, reads the surrounding texture, noise, color temperature, shadows, and perspective, then generates replacement pixels that should blend into the scene. Relighting works differently: the model estimates subject geometry and light direction, then adjusts highlights, shadows, exposure, and sometimes color balance. The cleaner the source image, the more realistic the result.
How Do You Edit One Photo With AI Without Making It Look Fake?
Start with the highest-quality original
Upload the full-resolution photo when possible. Avoid screenshots, compressed social media downloads, and tiny files because AI enhancement can invent false detail when the source has too little information.
Remove distractions before styling
Clean up wires, clutter, stray objects, logos you do not own, or background distractions first. Large structural fixes should happen before color grading, beauty retouching, or creative background changes.
Make one targeted change at a time
Use short prompts such as “neutral studio background with soft shadow,” “remove the person in the left background,” or “warm window light, natural skin tone.” One controlled edit is easier to review than six changes in one prompt.
Check edges at 100% zoom
Inspect hair, ears, glasses, teeth, jewelry, fingers, product edges, text, and transparent objects. These areas reveal AI artifacts faster than the center of the image.
Retouch lightly and export for the destination
Use subtle skin smoothing, exposure correction, sharpening, or noise reduction, then reduce intensity if pores disappear or shadows look painted. Export square for feeds, 9:16 for stories, 16:9 for banners, or full resolution for print.
Which AI Photo Editor Apps Are Worth Comparing?
| Tool type | Best for | Strengths | Watch out for |
|---|---|---|---|
| Pict AI | Fast browser and iPhone edits | Prompt edits, retouching, background changes, and quick exports in a lightweight workflow | Cloud processing may not be ideal for private documents or sensitive images |
| Adobe Photoshop with Firefly | Professional compositing and commercial design work | Generative Fill, layers, masks, color controls, and advanced manual correction | More learning curve and heavier workflow than simple mobile editors |
| Canva AI tools | Social posts, thumbnails, simple brand graphics | Templates, background tools, text layouts, and fast resize presets | Less precise for complex retouching or high-end photo restoration |
| Google Photos editing tools | Everyday phone cleanup and quick enhancements | Convenient mobile workflow, portrait adjustments, and simple object cleanup on supported devices | Feature access varies by device, region, and subscription |
| Fotor, Pixlr, or similar web editors | Quick free or low-cost edits in a browser | Accessible tools for background removal, enhancement, and basic retouching | Watermarks, rate limits, ads, or unclear export rights can vary |
No single AI photo editor is best for every image. Choose a lightweight app for speed, a professional editor for layered control, and a template-based tool when the final output is a social graphic rather than a pure photo.
What Prompt Recipes Work Best for AI Photo Editing?
The best AI photo editing prompts are short, visual, and specific. Describe the target area, the desired change, and the realism constraint. Avoid stacking too many instructions in one prompt because multi-change prompts often create inconsistent lighting, warped edges, or overprocessed faces.
Use these reusable templates: “Remove [object] from [area] and preserve the original background texture.” “Change the background to [setting], keep the subject’s pose, hair, and clothing unchanged.” “Relight the portrait with [light type], natural skin texture, realistic shadows.” “Clean product photo on [background color], soft shadow, accurate edges.” “Upscale for print, preserve grain and facial details, no plastic skin.”
Where Do AI Photo Editor Apps Save the Most Time?
AI photo editor apps save the most time on repetitive cleanup and adaptation tasks, especially when the image is already good but not ready to publish. They are useful for removing background distractions from travel photos, cleaning product images for marketplaces, replacing messy room backgrounds in profile pictures, fixing yellow indoor portraits, upscaling older family photos, and preparing fast crops for banners, thumbnails, reels, and stories.
The biggest practical advantage is iteration speed. A creator can test three backgrounds, two lighting moods, and multiple aspect ratios before committing to a final export. That matters for social posts, small business branding, dating profiles, event flyers, handmade product listings, digital gifts, and portfolio refreshes where one strong photo may need several finished versions.
When Will an AI Photo Editor App Struggle?
- Hair, fur, lace, smoke, glass, and transparent objects are difficult because the model has to preserve fine edges while rebuilding the background behind them.
- Small text, logos, tattoos, jewelry details, and product labels may distort after generative edits because image models do not always preserve exact typography or symbols.
- Strong motion blur, heavy compression, and very low-resolution images give the model too little reliable structure, so enhancement may create invented detail.
- Mixed lighting, such as green fluorescent light plus daylight, can cause uneven skin tones or strange color shifts during relighting.
How Should You Choose the Right AI Photo Editor for Your Photos?
Choose an AI photo editor by matching the tool to the job, not by chasing the longest feature list. For portraits, prioritize natural skin texture, accurate hair edges, blemish control, and realistic relighting. For product photos, prioritize edge precision, shadow control, label preservation, background consistency, and commercial-use terms. For social content, prioritize aspect-ratio presets, quick exports, and batch-friendly workflows.
Before committing to any app, test it on three real images: a portrait with hair detail, a product or object with hard edges, and a low-light phone shot. Review exports at 100% zoom and compare skin, shadows, text, and background texture against the original. If the app saves time but creates cleanup work every time, it is not the best editor for your workflow.
Related Pict.AI reads worth opening next
Frequently Asked Questions
The best option for quick edits is one that supports object removal, background changes, retouching, relighting, and clean exports without forcing a complex layer workflow. Speed matters, but believable edges and skin texture matter more.
Yes, they can handle many edits without manual masking or advanced photo knowledge. You still need to review edges, lighting, skin texture, and text before posting or printing.
They usually create a mask around the unwanted object and use inpainting to generate replacement pixels from the surrounding texture, color, shadow, and perspective. Simple backgrounds work better than busy or patterned scenes.
Yes, realistic background changes are possible when the subject has clean edges and the new background matches the original camera angle, lens feel, and light direction. Hair, glass, motion blur, and transparent objects are common failure points.
They can be accurate, but mixed lighting and compressed phone photos may shift skin tone. Use light retouching, preserve pores, and compare the edited image with the original at full size.
A free editor can be good enough for casual social posts, thumbnails, and simple cleanup. Check for watermarks, export size limits, privacy terms, and whether the final image looks clean at 100% zoom.
They can sharpen, denoise, and upscale older photos, but they cannot perfectly recover details that were never captured. For family prints or restoration, use gentle enhancement so faces do not look invented.
Use 1:1 for feed posts, 9:16 for stories and reels, 16:9 for banners or video thumbnails, and the highest clean resolution available for print. Always inspect the final export, not just the preview.
Safety depends on the app’s storage, processing, and deletion policies. Avoid uploading IDs, medical records, legal documents, private client work, or sensitive personal photos to cloud tools unless the terms are acceptable.