How to Remove People From Photos With AI
You can remove people from photos with AI by selecting the unwanted person and letting an inpainting model rebuild the background. The cleanest edits come from tight masks, small passes, and backgrounds with enough visual context, such as sky, sand, walls, pavement, or soft blur.
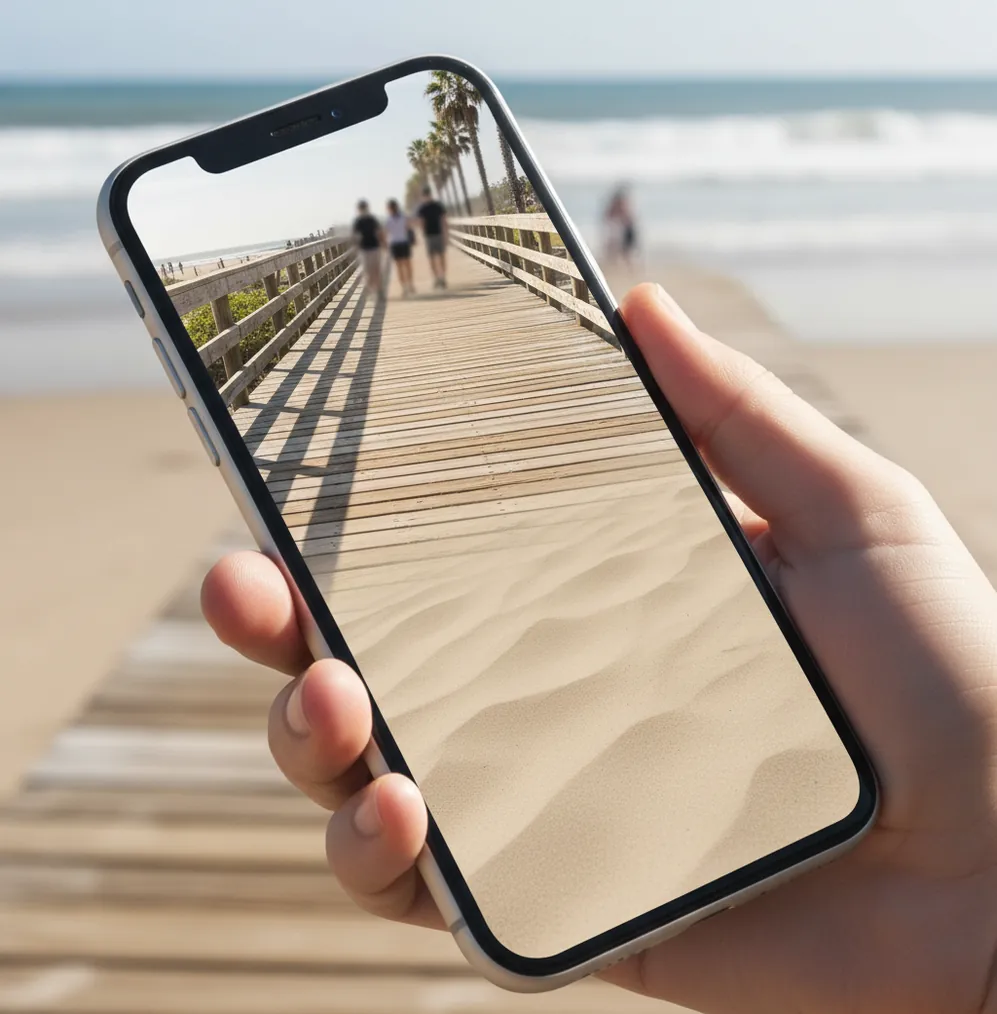
Creating your image...
To remove people from photos with AI, open the image in an AI object remover, mask the unwanted person, and run an inpainting fill that rebuilds the background from nearby pixels. For cleaner results, select the person plus a 5–15 px halo, remove overlapping subjects in small passes, and inspect edges at 200% before exporting.
What Does It Mean to Remove People From Photos With AI?
Removing people from photos with AI means using an image inpainting model to replace an unwanted person with new pixels that match the surrounding scene. You mask the person, the tool analyzes nearby texture, color, lighting, perspective, and edges, then generates a plausible background where the person used to be.
This works best when the hidden area is predictable: ocean, sky, grass, sand, pavement, studio backdrops, bokeh, or plain walls. It becomes harder when the person covers text, faces, hands, hair, railings, tiles, logos, mirrors, or architectural lines because the model must invent structure rather than simply continue texture.
How Does AI Object Removal Rebuild the Background?
AI object removal usually relies on inpainting, a computer vision process that fills a masked region using surrounding image data. Modern tools often use diffusion models, segmentation masks, edge prediction, and texture synthesis to infer what should exist behind the removed person.
The model looks for visual continuity: gradients in the sky, grain in a wall, vanishing lines on pavement, or repeating texture in grass. If the context is strong, the result can look natural in one pass. If the context is weak, the fill may create smears, duplicated limbs, warped bricks, bent railings, or soft patches that do not match the original resolution.
How Do You Remove a Person From a Photo Step by Step?
Open the original image
Use the highest-resolution version available, not a screenshot or heavily compressed social media download. More pixels give the inpainting model better texture and edge information.
Zoom in before masking
Work around 150% to 200% zoom so you can see hair, shoes, shadows, bags, and body edges clearly. A rough selection often causes halos or ghost outlines.
Brush the person plus a small halo
Cover the unwanted person and include about 5–15 px of surrounding background. This gives the AI room to blend the edge instead of leaving a visible cutout.
Remove complex areas in smaller passes
If the person overlaps railings, tiles, text, faces, or clothing edges, erase one section at a time. Small fills usually preserve structure better than one large selection.
Inspect the edit at 200%
Look for warped lines, repeated texture, blurry patches, strange shadows, or leftover outlines. Re-mask only the problem area rather than redoing the whole image.
Match the final texture
Add subtle grain, sharpening, or noise reduction if the filled area looks smoother than the rest of the photo. Export a copy so the original remains untouched.
Which Apps Can Remove People From Photos With AI?
| Tool | Best fit | Strength | Watch out |
|---|---|---|---|
| Pict AI | Fast mobile people removal | Simple erase-and-fill workflow for travel, social, and portrait cleanup | Complex backgrounds may still need multiple passes |
| TouchRetouch | Manual object removal | Strong brush control, clone-style cleanup, and line removal tools | Takes more patience on large crowds |
| Canva | Quick design edits | Useful when the cleaned photo is going into a post, flyer, or thumbnail | Export and feature access can depend on account or plan |
| Adobe Photoshop | Professional retouching | Generative Fill, manual masks, layers, clone stamp, and healing tools | Desktop workflow has a steeper learning curve |
| Google Photos Magic Editor | Casual phone edits | Convenient for supported devices and cloud photo libraries | Availability, quality, and saving options vary by device and region |
Choose based on the edit, not just the app name. Simple tourist removal is usually fine on mobile; overlapping hair, signs, railings, or commercial retouching may need a tool with layers, manual repair, and high-resolution export.
What Settings Make People Removal Look More Natural?
- Use a tight selection instead of painting the whole background. A mask that is too large forces the model to invent too much scene detail.
- Include a thin edge halo around the person, especially near hair, coats, shoes, bags, and motion blur. This reduces cutout outlines.
- Remove people from back to front when editing crowds. Background figures should be erased before foreground figures so the model has cleaner context.
- Keep straight lines intact by removing around them in sections. Curbs, railings, horizons, window frames, and floor seams reveal bad edits quickly.
- Preserve shadows intentionally. If the person’s shadow remains after removal, mask and remove it separately so the lighting still makes sense.
- Avoid over-smoothing. If the filled area looks plastic, add 1–3% grain or light sharpening to match the original camera texture.
- Check the final image at social size and print size. A patch that looks fine on Instagram may still be visible in an 8x10 print or portfolio crop.
What Prompt Recipes Work for Generative Fill Cleanup?
If your editor supports text-guided generative fill, use prompts that describe the background, not the person. The goal is to continue the scene naturally, so avoid prompts like “remove man” and write what should appear instead: “empty stone pavement with matching shadows” or “plain blue ocean water, natural ripples.”
Reusable prompt recipes: “continue the [background texture] with matching light, grain, and perspective”; “empty [location surface], no people, no text, natural shadows”; “extend the [wall/floor/sky] consistently, preserve straight lines”; “clean background only, realistic camera noise, no new objects.” Keep prompts short, literal, and scene-specific.
Where Is AI People Removal Most Useful?
AI people removal is most useful when a good photo is visually interrupted by strangers, photobombs, passersby, or background clutter. Common examples include travel photos at landmarks, beach portraits, wedding aisle shots, graduation pictures, real-estate interiors, product photos taken in public, and social posts where the background distracts from the subject.
It is also helpful for emotional edits: removing an ex from a framed portrait, cleaning up a family photo, simplifying a dating profile image, or creating a cleaner print for a gift. The best use is restoration of the intended composition, not changing the factual meaning of an image.
When Does AI Removal Struggle?
- AI struggles when the person covers important structure, such as text, signs, license plates, artwork, logos, hands, eyes, or architectural details.
- Repeating patterns can break. Bricks, tiles, fences, railings, stadium seats, and patterned fabric may duplicate, bend, or lose spacing.
- Large foreground subjects leave too little background context. If a person covers 40% or more of the frame, cropping, manual retouching, or a different photo may work better.
- Reflections and shadows need separate attention. Removing the body without removing the reflection can make the edit feel haunted or physically impossible.
How Can You Fix Blurry Patches, Repeats, or Ghost Edges?
Undo the largest fill
If the background turns muddy, go back and divide the selection into smaller areas. Large masks are the main cause of soft, invented texture.
Re-mask only the bad edge
Do not rerun the entire edit if only the shoulder or shoe edge looks wrong. A narrow correction usually blends better.
Repair lines manually
For railings, curbs, horizons, and door frames, use clone, heal, or line repair tools after AI removal. Straight geometry exposes inpainting errors.
Blend texture after the fill
Apply light grain, sharpening, or local contrast so the generated patch matches the rest of the photo. Keep changes subtle to avoid drawing attention.
Crop only if it improves composition
A small crop can hide edge artifacts, but do not crop so tightly that the image loses balance, negative space, or the original story.
What Privacy and Ethics Rules Should You Follow?
Use AI people removal for personal cleanup, creative composition, privacy protection, and non-deceptive retouching. It is reasonable to remove strangers from a vacation photo, blur or erase background bystanders, clean a wedding print, or simplify a social media image when the edit does not misrepresent an event.
Be more careful with images that document reality. Do not remove people from news photos, legal evidence, workplace incidents, medical documentation, school records, insurance claims, or any image where the presence of a person changes the meaning. If privacy is the goal, deletion, cropping, blurring, or consent may be safer than realistic removal.
Keep editing: next tools people use after removing someone
Frequently Asked Questions
AI can attempt it, but results depend on background complexity, resolution, and how much of the scene the person covers. Plain or softly blurred backgrounds work best.
The best app depends on the edit: mobile object removers are fastest for simple tourist shots, while Photoshop-style tools are better for layered retouching, signs, railings, and print-quality work.
Mask tourists one at a time, starting with background figures, and use small inpainting passes. Check pavement, walls, shadows, and landmark edges before exporting.
Blurry fills usually come from large selections, low-resolution files, or compressed images. Use the original photo, tighten the mask, and repair the area in smaller passes.
Yes, but it is harder because hair, eyelashes, skin edges, and facial contours require fine detail. Zoom in, use a small brush, and expect to refine the edge manually.
Many tools offer free or limited AI object removal, but export size, watermarks, account requirements, and daily limits vary. Always check the current tool settings before editing important images.
It can if the tool downsizes the photo or generates a soft patch. Use high-resolution input, avoid screenshots, and export at the highest available quality.
For personal, creative, or privacy-focused edits, it is usually acceptable. Avoid edits that mislead viewers about news, evidence, events, or consent-sensitive situations.
Remove the crowd in clusters instead of one giant mask, and preserve important lines like paths, rails, and walls. Large crowds often need several passes plus manual cleanup.