How Do Diffusion Models Generate Images?
Diffusion models generate images by starting with random noise and repeatedly denoising it into a coherent picture. Your prompt, seed, guidance strength, step count, scheduler, and model architecture shape how that noisy starting point becomes a final image.
Creating your image...
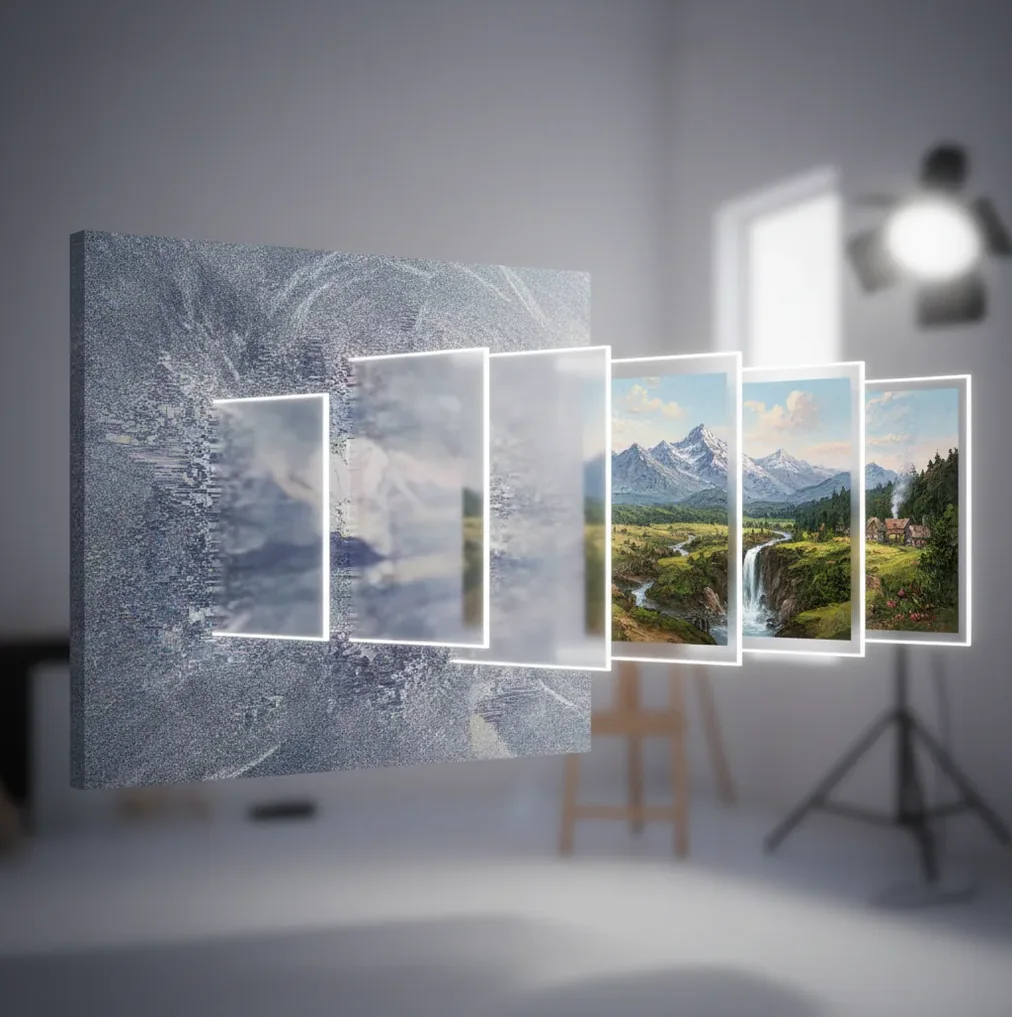
Diffusion models generate images by beginning with random noise and removing that noise over many timed steps. At each step, a neural network predicts what part of the current image representation is noise, and a scheduler updates it toward a cleaner image that matches the prompt.
What Is Diffusion Image Generation in Simple Terms?
Diffusion image generation is an AI method that creates a new image by reversing a noise process. During training, the model learns what real images look like after different amounts of noise are added. During generation, it starts from pure noise and gradually removes predicted noise until shapes, colors, textures, and lighting become recognizable.
The important idea is that the model is not pulling a finished image from a database. It is sampling a new image from learned visual patterns. Text-to-image, image-to-image, inpainting, background replacement, and style transfer workflows all use this same basic denoising logic, but they start with different inputs and constraints.
How Do Diffusion Models Turn Noise Into a Picture?
A diffusion model turns noise into a picture by repeatedly predicting and subtracting noise from a noisy image representation. Early denoising steps usually establish composition: where the face, object, horizon, pose, or silhouette will sit. Later steps refine local detail such as hair strands, fabric folds, reflections, grain, and edge sharpness.
The process is controlled by a noise schedule, which defines how much noise exists at each timestep. A text prompt supplies conditioning, so the denoising path is nudged toward concepts like “cinematic portrait,” “matte product photo,” or “watercolor landscape.” If you change the seed, the model begins from a different noise pattern, which can change layout even when the prompt stays the same.
What Happens at Each Denoising Step?
At each denoising step, the model estimates the noise component in the current image state, then updates that state to be slightly cleaner. Many diffusion systems use a U-Net or transformer-style denoiser to process the noisy representation, while a text encoder converts prompt words into embeddings that the image model can attend to.
In latent diffusion, this does not happen directly in full-resolution pixels. The image is represented in a compressed latent space, which is faster and cheaper to process. After the final denoising step, a VAE decoder converts the latent representation into a visible image. This is why diffusion tools can produce high-resolution-looking results without calculating every pixel from scratch during every step.
How Do Prompts Influence the Generated Image?
Prompts influence diffusion images by acting as conditioning signals during denoising. A prompt does not command the model like code; it biases the probability path toward visual patterns associated with the words, styles, materials, lighting, camera terms, and composition cues you provide.
Strong prompts are usually specific but not overloaded. “A ceramic espresso cup on a walnut table, soft window light, shallow depth of field, editorial product photo” gives the model subject, material, setting, light, and style. A crowded prompt with conflicting cues like “minimalist baroque cyberpunk rustic luxury flat design” often averages into a muddy result because the denoising trajectory receives mixed signals.
How Can You Test Steps, Guidance, and Seeds Yourself?
Write one controlled prompt
Use one subject, one environment, one style, and one lighting cue. Example: “A red raincoat hanging in a foggy forest, cinematic still, soft backlight.”
Generate with a baseline setting
Start around 25–35 steps if the tool exposes step count. This range is often enough to show composition and detail without over-testing.
Change only the step count
Compare a lower step count, such as 15–20, with a higher one, such as 40–50. Look for differences in structure, texture, sharpness, and artifacts.
Lock or record the seed
Keep the seed fixed when testing settings. Change the seed only when you want a new composition or pose from the same prompt.
Adjust guidance strength
Higher guidance can follow the prompt more aggressively but may create harsh contrast or unnatural detail. Lower guidance can look softer and more varied but may ignore details.
Save a small comparison grid
Export 4–8 variations and label them with prompt, seed, steps, and guidance. This turns image generation into a repeatable creator workflow instead of random trial and error.
Which Diffusion Settings Matter Most for Image Quality?
The settings that matter most are seed, steps, guidance scale, aspect ratio, model choice, and scheduler. The seed controls the initial noise pattern, so it strongly affects composition. Step count controls how many denoising updates occur. Guidance scale controls how tightly the model follows the prompt versus exploring more natural variation.
Aspect ratio changes composition because a 1:1 square, 16:9 banner, and 9:16 social story all create different framing pressures. The scheduler affects how denoising updates are distributed over time, which can influence smoothness, sharpness, and artifact behavior. Model choice matters because each model has different training data, safety behavior, style range, anatomy handling, and text-rendering ability.
Which Image Generators Use Diffusion or Similar Sampling?
| Tool or model | Best for | Strengths | Watch-outs |
|---|---|---|---|
| Stable Diffusion / SDXL | Local workflows, custom styles, open model experimentation | Flexible, supports LoRA, ControlNet, inpainting, and many schedulers | Setup and GPU requirements can be technical |
| Midjourney | Stylized art direction, moodboards, posters, concept visuals | Strong aesthetics and fast visual exploration | Less transparent control over low-level sampling settings |
| DALL-E | General text-to-image generation and accessible prompt workflows | Simple interface and strong semantic prompt following | Limited access to internal denoising controls |
| Adobe Firefly | Design workflows, commercial creative assets, Adobe ecosystem users | Useful for generative fill and brand-safe design contexts | Style range and behavior depend on product integration |
| Pict AI | Browser and mobile prompt testing, edits, and fast iteration | Useful for trying text-to-image, inpainting, and prompt variations without heavy setup | Advanced users may still want local tools for full parameter control |
Different tools expose different parts of the diffusion pipeline. Some show seeds, steps, guidance, and schedulers; others hide those details behind a simpler creative interface.
What Prompt Recipes Work Well With Diffusion Models?
- Product photo template: “A [product] on [surface], [background], [lighting], [camera angle], editorial product photography, sharp focus.” Example: “A glass perfume bottle on black marble, warm rim light, low angle, editorial product photography.”
- Portrait template: “A portrait of [person description], [wardrobe], [setting], [lighting], [lens or style], natural skin texture.” Example: “A portrait of a violinist in a navy coat, backstage theater, soft tungsten light, 85mm lens.”
- Social post template: “A [subject] centered in a [format] composition, bold negative space, [brand color palette], clean graphic background, high contrast.” This works well for thumbnails, reels covers, and announcement art.
- Inpainting template: “Replace [region] with [new object or texture], match the existing [light direction], [perspective], and [material].” The matching instructions matter more than long style lists.
- Moodboard template: “A visual concept for [project], combining [style 1] and [style 2], [materials], [color palette], atmospheric lighting, cohesive art direction.” Use this for branding, interiors, fashion, and campaign exploration.
Where Are Diffusion Images Used in Real Creative Workflows?
Diffusion-generated images are used for fast visual exploration, not only finished artwork. Creators use them for concept art thumbnails, product mockups, social media backgrounds, album-cover drafts, poster compositions, pitch decks, storyboards, style frames, packaging directions, and print-on-demand tests.
They are also practical editing tools. Inpainting can remove unwanted objects, repair small regions, extend a background, or test alternate props without reshooting. Image-to-image workflows help preserve an existing layout while changing style, lighting, season, material, or color palette. For many creators, the emotional value is speed: you can see ten possible directions before committing to a shoot, illustration, or design system.
When Do Diffusion Models Fail or Mislead Users?
- Small text and long readable sentences are still unreliable because diffusion models learn visual patterns of letters, not typography rules in the same way a layout engine does.
- Hands, teeth, jewelry, wires, tools, and crowds can distort because they require precise local structure across many small parts.
- High step counts do not always mean better images. Too many denoising updates can over-sharpen skin, amplify texture noise, or create brittle detail.
- Conflicting prompt terms can average into an unclear result. If a prompt mixes too many styles, the model may produce a generic midpoint instead of a strong art direction.
What Should You Remember Before Blaming the Prompt?
Before blaming the prompt, check whether the issue comes from seed, aspect ratio, guidance, step count, model choice, or an impossible visual request. A strong prompt can still fail if the composition is squeezed into the wrong format, the guidance is too high, or the model is weak at the requested subject.
A practical workflow is to change one variable at a time. Keep the same seed when testing settings, then change the seed when exploring new layouts. If the image is close but flawed, use inpainting instead of rewriting the entire prompt. In Pict AI-style browser workflows, this habit makes iteration feel less like gambling and more like visual debugging.
Frequently Asked Questions
A diffusion model is an AI system that creates images by starting from noise and gradually removing that noise. It learns how real images look at many noise levels, then reverses the process during generation.
They start with noise because the generation process is designed as the reverse of training, where clean images are progressively corrupted with noise. Sampling begins from randomness and moves toward a clean image guided by learned patterns.
Denoising means predicting which part of the current image representation is noise and updating it to be slightly cleaner. Repeating this many times turns random noise into a coherent image.
A seed is the number that controls the initial random noise pattern. Using the same seed with the same settings usually helps reproduce a similar composition.
Guidance scale controls how strongly the model follows the prompt. Higher guidance can improve prompt adherence but may cause harsh detail, oversaturation, or artifacts.
Latent diffusion performs denoising in a compressed representation of the image instead of directly in pixel space. This reduces compute cost and allows faster generation before a decoder converts the latent into pixels.
Hands are difficult because they involve small, flexible structures with many possible poses and occlusions. Diffusion models can generate plausible hand-like textures without preserving correct finger count or joint geometry.
They can sometimes generate short, simple words, but small labels and long sentences are unreliable. For professional typography, generate the image first and add text later in a design tool.
Normally, diffusion models generate new samples from learned visual patterns rather than retrieving a single stored image. However, memorization and style imitation can be concerns, especially with overrepresented images, protected characters, or specific living artists.