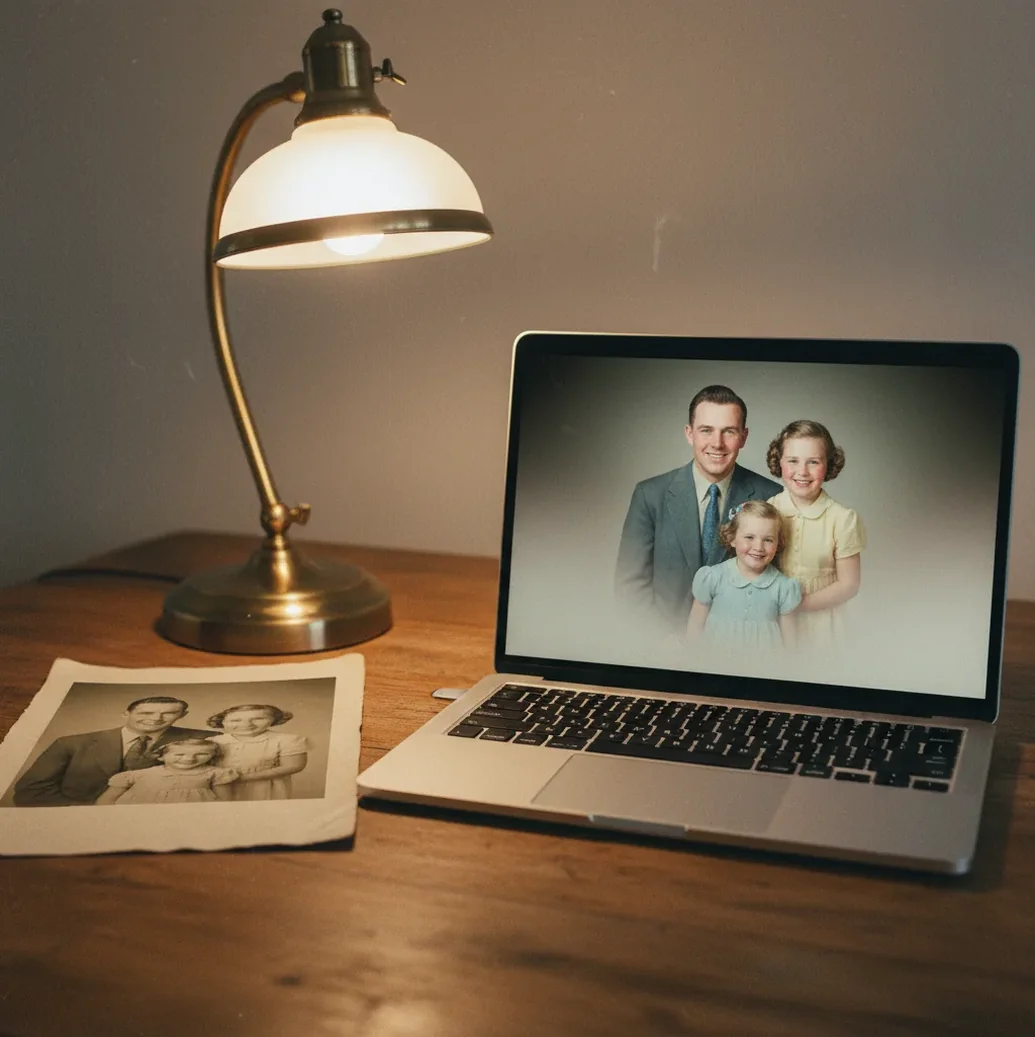
How to Colorize Black and White Photos With AI
To colorize black and white photos with AI, start with the cleanest scan you can make, let a colorization model infer plausible skin, fabric, sky, and background colors, then review the result for obvious errors. The best results come from treating AI color as restoration, not magic: clean dust first, check historical details, and export a high-resolution copy for prints or keepsakes.
Creating your image...
To colorize black and white photos with AI, upload a clean scan or well-lit phone capture to an AI photo colorizer, run the colorization model, and inspect skin tones, clothing, sky, and shadows for accuracy. AI colorization predicts plausible colors from grayscale tones and scene context, but it cannot know the original colors unless you provide references.
What Is AI Photo Colorization?
AI photo colorization is the process of adding plausible color to a grayscale image using a computer vision model trained on color photographs. The model reads luminance, edges, textures, faces, clothing, plants, buildings, and other visual cues, then predicts chrominance values that fit the scene.
The result is a believable reconstruction, not a verified historical record. A gray jacket may become navy, brown, or olive because those colors can share similar brightness in black-and-white film. For family albums, memorial boards, social posts, gifts, and framed prints, the goal is usually emotional realism: skin should feel alive, whites should stay clean, and the scene should not look painted over. Pict AI is one browser-based option for this kind of restoration workflow.
How Does AI Predict Color From a Black-and-White Image?
AI colorizers treat a black-and-white photo as luminance data and generate likely color channels from visual context. Technically, many systems use convolutional neural networks, transformer-based vision models, diffusion models, or hybrid restoration pipelines to identify objects and assign probable color distributions.
The model does not recover hidden pigment from the photo paper. It estimates color from learned patterns: faces usually fall into skin-tone ranges, grass often shifts green, skies often shift blue, and old wood or brick gets warm brown or red tones. Ambiguity is the hard part. A mid-gray dress could have been red, blue, lavender, or black, so the model may choose the statistically common answer unless you guide it with references or manual edits.
How Do You Prepare an Old Photo Before Colorizing It?
Scan or Photograph the Print Cleanly
Use a flatbed scan at 300 to 600 dpi when possible. If you use a phone, shoot in indirect window light, keep the camera parallel to the paper, and avoid glare on glossy prints.
Crop and Straighten the Image
Crop to the photo edges and fix tilt before colorization. Even a 2-degree slant can make faces, collars, and horizons feel wrong in a restored portrait.
Remove Dust, Scratches, and Creases First
Clean damage that crosses eyes, lips, cheeks, or hairlines before adding color. Dust specks often turn into red, orange, or blue spots after colorization.
Balance Exposure and Contrast
Lift muddy shadows and reduce harsh highlights before running the model. Very dark jackets, hats, and backgrounds can stay colorless if the grayscale detail is crushed.
Save a Master Copy
Keep the original scan untouched, then work from a duplicate. Export a full-resolution restoration for printing and a smaller JPEG or PNG for messages, social posts, or family archives.
How Do You Colorize a Black-and-White Photo With AI Step by Step?
Upload the Best Version of the Photo
Choose the clean scan or corrected phone capture, not a compressed screenshot from a chat app. Higher resolution gives the model more texture around eyes, hair, clothing, and background objects.
Run the AI Colorization Pass
Use an AI colorizer to generate the first color version. Treat this as a draft: the model is proposing likely colors, not proving what the original scene looked like.
Check Skin, Whites, and Sky First
Inspect faces, white shirts, wedding dresses, clouds, and open sky. These areas reveal most unrealistic color casts quickly.
Fix Saturation and Color Bleed
If the output looks cartoonish, reduce saturation slightly and zoom to 200% to inspect hairlines, collars, glasses, hat brims, and fingers for color spill.
Compare With Historical References
For uniforms, flags, cars, school colors, or branded signs, compare with dated reference photos. AI often guesses these details incorrectly because grayscale values are ambiguous.
Export for the Final Use
Use PNG or high-quality JPEG for archiving. For a framed print, export at the highest available resolution and avoid repeated saving, which can add compression artifacts.
Which AI Photo Colorization Tools Are Best for Different Workflows?
| Tool | Best For | Strengths | Watchouts |
|---|---|---|---|
| Pict AI | Fast restoration of portraits and family scans | Browser workflow, quick previews, colorization plus cleanup options | Online processing may not suit highly sensitive images |
| Adobe Photoshop or Lightroom | Manual retouching and professional print preparation | Layer masks, color grading, local corrections, strong export control | Requires more skill and usually more time per image |
| Palette.fm | Prompt-guided color styles and quick web previews | Useful for trying multiple color moods on one image | Results may need manual correction for historic accuracy |
| MyHeritage In Color | Genealogy and family archive workflows | Simple restoration flow for old portraits and family photos | Licensing, account, and privacy terms should be checked |
| DeOldify | Open-source experimentation and batch workflows | Flexible for technical users and custom pipelines | Setup can be harder than browser-based tools |
| Mobile photo editors | Quick social sharing from phone captures | Convenient for casual scans and before-and-after posts | Small screens make color bleed and facial artifacts harder to notice |
Choose the tool based on the final job: a keepsake print needs resolution and control, a family group chat needs speed, and a historical archive needs references plus careful documentation.
What Settings Make AI-Colorized Photos Look Realistic?
Realistic colorization usually comes from restrained saturation, clean tonal range, and believable local color. Skin should have variation across cheeks, lips, forehead, and shadows; clothing should keep fabric texture; and background objects should not compete with the subject.
A practical review order is skin first, whites second, sky and foliage third, then clothing and props. If a face looks waxy, reduce smoothing or run restoration separately from colorization. If a white shirt turns blue or yellow, correct the white balance before judging the rest of the image. For prints, slightly softer color often looks more authentic than high saturation because old lenses, film stocks, and paper textures rarely produce modern smartphone color.
Can You Use Prompts or Reference Notes for Better Colorization?
- Use this prompt if your tool supports text guidance: "Colorize this 1940s family portrait with natural skin tones, muted period-appropriate clothing, warm indoor light, and no oversaturated colors."
- For military or school photos, use: "Preserve facial detail. Use historically accurate uniform colors only where confident. Keep unknown fabric colors muted rather than bright."
- For wedding photos, use: "Keep the dress neutral white or ivory, preserve lace texture, use soft skin tones, and avoid color bleed into the veil or flowers."
- For street photography, use: "Natural documentary color, realistic pavement and building tones, subtle sky color, no cinematic teal-orange grading."
- Reference-note template: "Known colors: car was dark green, dress was pale blue, background house was red brick, photo was taken in summer daylight."
- Restoration note template: "Clean scratches on faces before colorizing; keep film grain visible; do not over-smooth skin or sharpen eyes unnaturally."
Where Is AI Colorization Useful Beyond Family Albums?
AI colorization is useful anywhere a black-and-white image needs to feel more immediate without replacing the original archive. Creators use it for genealogy pages, memorial displays, wedding anniversary gifts, museum education, classroom materials, scanned newspaper images, film photography portfolios, and social posts that compare before-and-after restoration.
The strongest use cases are emotional and interpretive rather than evidentiary. A restored portrait can help younger relatives connect with an ancestor, make a memorial board feel warmer, or turn a faded shoebox print into a framed gift. For museums, researchers, and archives, the colorized version should be labeled as interpretive so viewers understand it is a modern reconstruction.
When Is AI Colorization Guessing Instead of Recovering Real Color?
- AI cannot know the true original colors from grayscale alone; it predicts plausible colors based on patterns learned from other images.
- Uniforms, medals, flags, product packaging, school colors, and car paint are high-risk details because different colors can share the same grayscale value.
- Low-resolution faces may become waxy or overly smooth, especially when restoration and colorization are applied too aggressively in one pass.
- Glare, scanner streaks, silvering, mold, and paper texture can be interpreted as real scene detail and turned into strange color blotches.
Related Pict.AI guides for fixing and combining photos
Frequently Asked Questions
It means an AI model adds estimated color to a grayscale image based on tones, objects, textures, and patterns learned from color photos. The result is plausible color, not guaranteed original color.
It can be visually convincing for faces, skies, grass, and common clothing, but it may guess wrong on specific garments, uniforms, cars, or room colors. Use reference photos when accuracy matters.
A 300 to 600 dpi scan is a good range for most prints. Save as PNG or high-quality JPEG and avoid heavy sharpening before colorization.
Yes, if the phone capture is sharp, evenly lit, and free of glare. Keep the phone parallel to the print and crop away the table or background before uploading.
Clean major scratches, dust, and creases before colorization when they cross faces or important objects. Small background marks can often be corrected after the first color pass.
They usually look fake because saturation is too high, skin is over-smoothed, whites have a color cast, or color bleeds across edges like hairlines and collars. Lower saturation and inspect the image at 200% zoom.
No, not without a reference. Several colors can produce the same gray value, so the AI chooses a likely color based on context rather than recovering the original pigment.
Use PNG or high-quality JPEG for archiving and printing. Keep the original scan and the colorized version as separate files so you can re-edit later.
Yes, if the image is clearly labeled as colorized or interpretive. For scholarly or archival use, keep the original black-and-white scan available alongside the restored version.