How to Fix AI Art That Looks Fake or Uncanny
AI art usually looks fake when skin texture, lighting, anatomy, depth, and camera cues do not agree with each other. You can make it feel more believable by correcting the biggest realism signals first: light direction, surface detail, hands, eyes, shadows, and lens behavior.
Creating your image...
To fix AI art that looks fake or uncanny, start by identifying the realism breaks: waxy skin, mismatched shadows, distorted hands, glassy eyes, warped text, or impossible perspective. Regenerate or edit with one clear light source, natural micro-texture, realistic camera settings, subtle grain, and targeted anatomy cleanup. Always inspect the final image at 100% zoom before exporting, because small artifacts often create the uncanny effect.
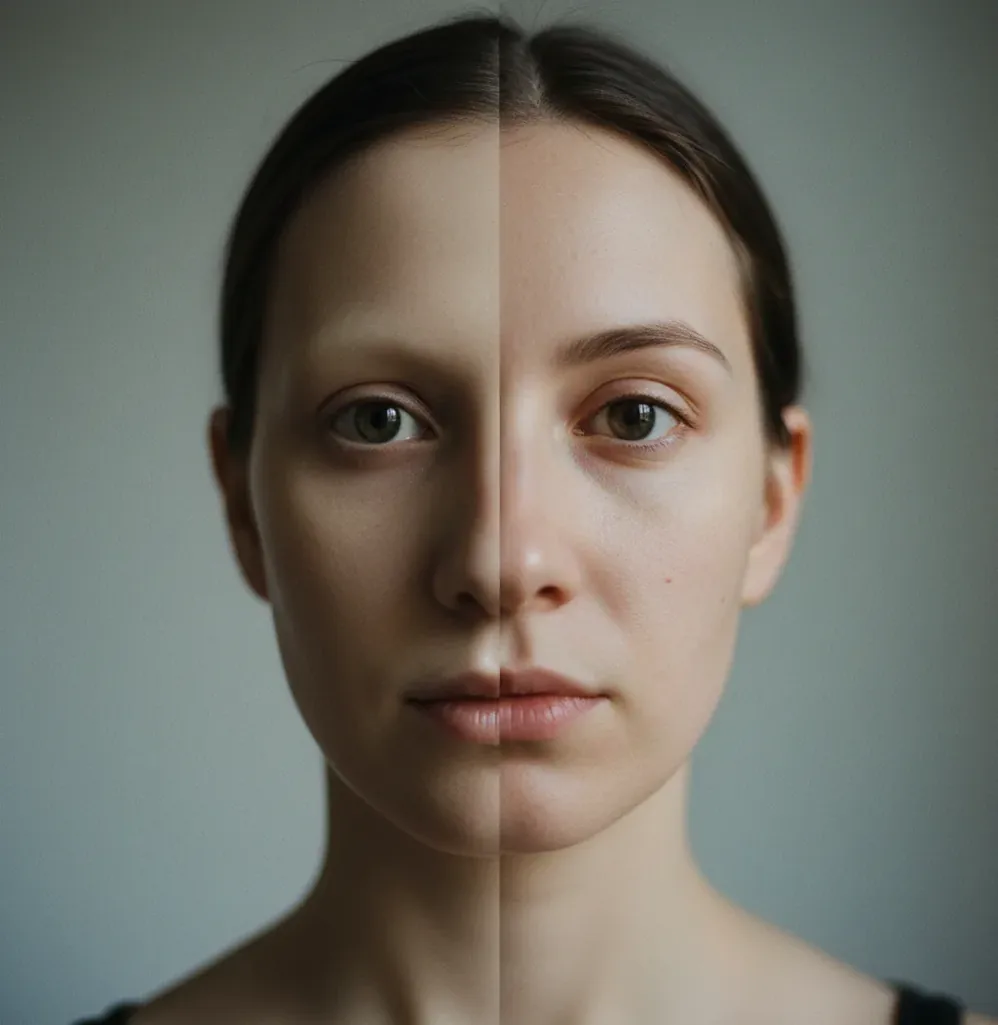
What Makes AI Art Look Fake or Uncanny?
AI art looks fake or uncanny when the image contains visual cues that conflict with how real photos behave. The most common giveaways are waxy skin, over-smoothed faces, inconsistent shadows, mismatched eye reflections, extra fingers, warped jewelry, unreadable text, and backgrounds that are too sharp or too clean.
The uncanny feeling often comes from a mismatch between high-level realism and low-level errors. A portrait may have beautiful composition and sharp eyes, but if the pores are missing, the teeth are uneven, and the hairline melts into the background, viewers read it as synthetic. The fix is not simply “more detail.” The fix is targeted realism: coherent lighting, believable anatomy, natural texture, correct depth-of-field, and small imperfections that make the image feel captured instead of rendered.
How Do You Fix Fake-Looking AI Art Quickly?
Inspect the image at 100% zoom
Look for the first details that break belief: hands, eyes, teeth, skin, hair edges, jewelry, text, shadows, and background objects. Mark only the obvious problems so you do not over-edit the whole image.
Lock one main light source
Use a prompt or edit direction such as “single soft window light from the left, consistent shadows, no extra rim light.” Mixed lighting is one of the fastest ways an otherwise good image starts to feel fake.
Add natural micro-texture
Restore subtle pores, skin variation, fabric weave, paper grain, dust, or surface roughness depending on the subject. Avoid heavy sharpening; it often makes artifacts more visible.
Correct anatomy before polishing
Fix hands, fingers, ears, teeth, pupils, necks, and joints before color grading. Texture cannot save a portrait if the skeleton or facial structure is visibly wrong.
Match lens and depth-of-field
A real camera has optical behavior. Keep the subject sharp, let the background soften naturally, and avoid the sharp-everywhere look unless the style is intentionally graphic.
Export and re-check on a phone
Social compression and small screens reveal different problems. Before posting, check the image on mobile for crunchy edges, plastic skin, strange eyes, and halos around the subject.
What Prompt Fixes Make AI Images Look More Real?
The best prompt fix is to describe camera behavior, lighting, texture, and imperfections instead of only asking for “realistic” or “photorealistic.” Models respond better when realism is broken into visual signals: lens length, aperture, light direction, skin detail, shadow consistency, film grain, and material texture.
Use this portrait prompt recipe: “35mm documentary photo, single soft window light from camera left, natural skin texture, visible pores, slight under-eye texture, realistic eye reflections, subtle film grain, true-to-life color, shallow depth-of-field, background softly blurred, no plastic skin, no extra fingers.”
Use this product or object prompt recipe: “real studio photograph, 50mm lens, softbox from upper left, physically accurate shadows, natural material texture, slight surface imperfections, realistic reflections, grounded contact shadow, neutral color grade, no floating objects, no warped labels.”
How Do Lighting and Camera Cues Reduce the Uncanny Look?
Lighting and camera cues reduce the uncanny look because they give the image a consistent physical logic. In real photography, highlights, shadows, reflections, depth-of-field, motion blur, sensor noise, and lens distortion all follow predictable rules. When an AI image ignores those rules, the viewer may not know why it feels wrong, but they can feel that it is wrong.
A strong realism prompt should include one main light direction, a plausible lens, and a clear depth relationship between foreground and background. For portraits, 35mm, 50mm, and 85mm cues usually feel more natural than extreme wide-angle unless you want distortion. For lifestyle images, mild film grain and imperfect skin or fabric texture help prevent the smooth plastic render that makes AI photos look synthetic.
Which Tools Help Fix Uncanny AI Images?
| Tool type | Best for | Realism strengths | Watchouts |
|---|---|---|---|
| Pict AI | Generating a cleaner base image and making fast realism edits in browser or iOS | Prompt retries, texture cleanup, object fixes, and natural-looking photo polish | Licensing, privacy, and storage terms should be checked for the specific use case |
| Photoshop or generative fill editors | Precise local repair, masking, compositing, and professional retouching | Strong control over hands, edges, backgrounds, color, and layered edits | Requires more skill and may take longer than prompt-based iteration |
| Lightroom or photo color editors | Color grading, grain, contrast, lens correction, and final export polish | Good for making AI images match a real camera or brand visual style | Cannot reliably fix broken anatomy, melted objects, or bad hands |
| Canva-style design editors | Social posts, thumbnails, quick crops, text overlays, and brand assets | Fast layout work after the AI image is already believable | Limited control over subtle anatomy, texture, and lighting errors |
| Inpainting or image-to-image tools | Replacing specific bad regions without regenerating the full image | Useful for fingers, teeth, logos, jewelry, hairlines, and background artifacts | Can introduce new inconsistencies if the mask is too large or vague |
The best workflow is usually hybrid: generate or regenerate the base image, repair the most visible uncanny details, then finish with color, grain, crop, and export settings.
What Details Should You Check Before Exporting AI Art?
- Check hands and fingers first, especially overlapping fingers, thumbs, knuckles, fingernails, and wrist angles.
- Zoom into eyes and make sure the pupils, catchlights, eyelids, and gaze direction match on both sides.
- Inspect skin for waxy smoothing, missing pores, plastic shine, duplicated freckles, or unnatural under-eye texture.
- Look at teeth, ears, hairlines, jewelry, glasses, buttons, zippers, and shoelaces because small repeated forms often warp.
- Confirm that shadows point in the same direction and that objects have grounded contact shadows instead of floating edges.
- Check text, labels, tattoos, logos, and signage; AI-generated lettering often looks almost right but fails on close inspection.
- Review depth-of-field: the subject should be sharper than the background unless the image is intentionally flat or graphic.
- Test the image at social size, print size, and phone-screen size if it will be used for posts, gifts, posters, portfolio work, or branding.
When Can’t You Fully Fix the Fake AI Look?
- If the base anatomy is structurally wrong, adding pores, grain, or sharper detail will not make the image believable.
- If the perspective is impossible, such as a face shot with extreme wide-angle distortion and normal body proportions, a full regeneration may be faster than editing.
- If tiny text, logos, or product labels must be accurate, AI generation alone is unreliable; use manual typography or a dedicated design editor.
- If the lighting has multiple conflicting sources, fixing every shadow may be harder than regenerating with one clear light direction.
How Should Creators Use Realism Fixes in Real Projects?
Creators should use realism fixes based on the final context: social posts need instant believability at small size, prints need clean texture at high resolution, product mockups need accurate materials, and portfolio images need consistency across a series. The goal is not to make every image hyperreal; the goal is to remove the details that distract from the idea.
For profile photos and personal branding, prioritize skin texture, eye realism, hairline edges, and natural lighting. For product visuals, prioritize contact shadows, reflections, labels, and material roughness. For album covers, posters, and editorial art, you can keep stylized color or surreal composition as long as anatomy, depth, and focal logic feel intentional rather than broken.
Related reads for hands, text, and photo editing
Frequently Asked Questions
High resolution only adds pixels; it does not guarantee believable lighting, anatomy, texture, or perspective. A 4K image can still look fake if the skin is waxy, shadows conflict, or hands are malformed.
The fastest fix is to use one consistent light source and add subtle natural texture such as pores, fabric weave, surface roughness, or film grain. These changes usually reduce the plastic AI look quickly.
Reduce smoothing and add controlled micro-texture: visible pores, slight blemishes, natural under-eye detail, and soft grain. Avoid global sharpening because it can turn skin into crunchy noise.
Hands are difficult because they contain many small joints, overlapping shapes, and perspective changes. Viewers know hand anatomy well, so even one extra finger or strange knuckle makes the whole image feel uncanny.
Use a single clear lighting setup, such as “soft window light from the left, consistent shadows, realistic eye reflections, no extra rim light.” Specific light direction works better than simply saying “cinematic lighting.”
Subtle grain can help because real photos contain sensor noise and texture, but too much grain looks like a filter. Use light grain after fixing anatomy, shadows, and skin texture.
Regenerate if the anatomy, perspective, or lighting is fundamentally broken. Edit if the composition is good and the main problems are local details like fingers, teeth, texture, edges, or background artifacts.
Focus on contact shadows, realistic reflections, accurate labels, material texture, and scale. Products look fake quickly when they float, shine incorrectly, or have warped text.
Yes, if the base image has correct anatomy and clean composition, but you should inspect it at print size before exporting. Look for warped details, muddy upscaling, oversharpened edges, and texture that falls apart close up.