How to Fix Red-Eye in Photos With AI
AI can fix red-eye by detecting the face, isolating the pupil, and replacing the red flash reflection with a natural dark pupil while preserving eye detail. The best results come from sharp photos, light correction strength, and checking the catchlight before export.
Creating your image...
To fix red-eye in photos with AI, upload the image to an AI photo editor, let it detect the eyes, and apply a pupil-only red-eye correction. Check the result at 100% and 200% zoom so the pupil stays dark but not flat, and make sure the catchlight, iris edge, eyelashes, and skin texture remain intact.
What Causes Red-Eye in Flash Photos?
Red-eye happens when a camera flash reflects off the blood-rich retina at the back of the eye and records as a red glow inside the pupil. It is most common in dim rooms because pupils dilate, letting more flash light enter the eye before it bounces back toward the lens.
The effect is stronger when the flash is close to the lens, which is why compact cameras, phone flashes, party booths, and indoor event photos often produce red pupils. AI correction works best when the red area is clearly inside the pupil and the eye is not heavily blurred, squinting, or hidden behind glare.
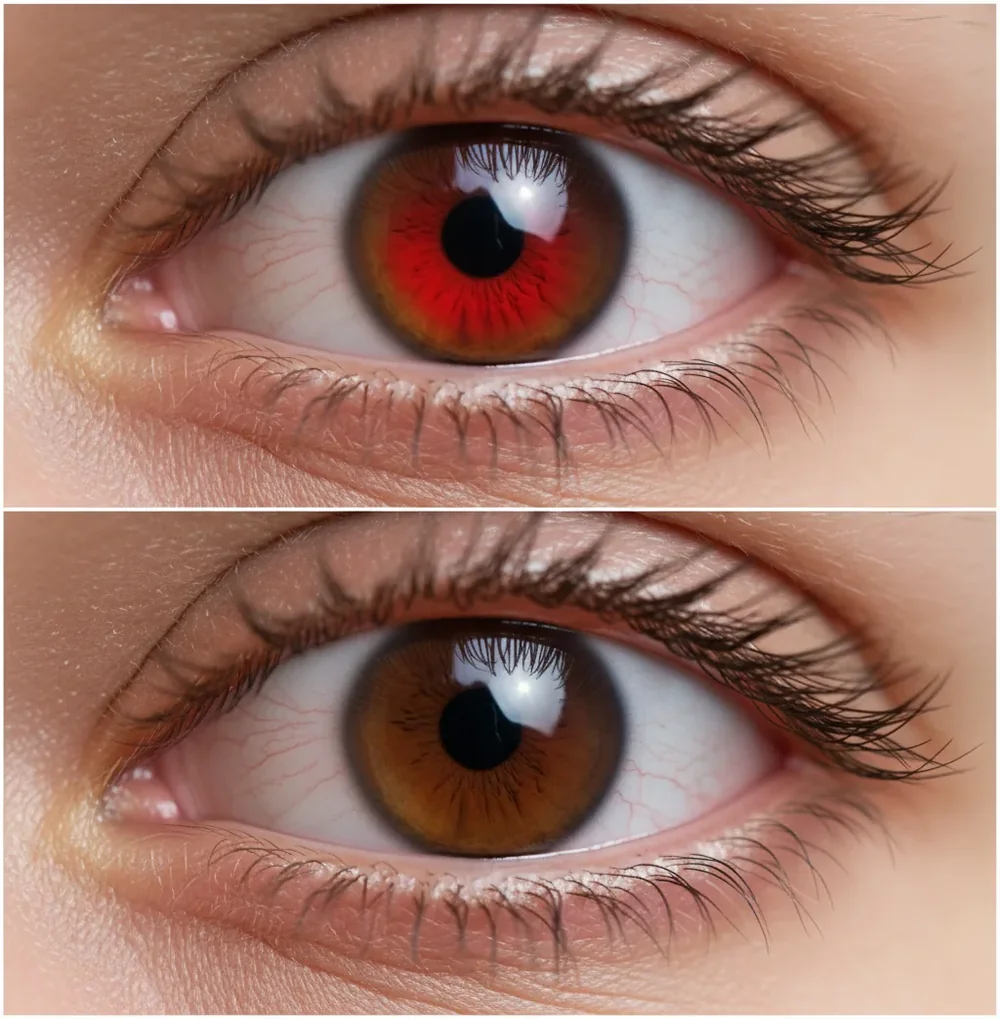
Can AI Remove Red-Eye From Photos Automatically?
Yes, AI can remove red-eye automatically when the face and pupil are visible enough for detection. Most AI red-eye tools use face detection, eye landmarking, pupil segmentation, and color replacement to target only the red pupil area instead of darkening the entire eye.
A good correction does more than paint the pupil black. It keeps the specular highlight, known as the catchlight, protects the iris edge, and blends the new pupil color into the original lighting. This matters for portraits, social posts, family albums, prints, and profile photos because overcorrected eyes can look gray, hollow, or artificial.
How Do You Fix Red-Eye in a Photo With AI?
Choose the sharpest original
Start with the highest-resolution file you have, not a screenshot or compressed chat image. Sharp eyelashes and a clear pupil boundary give the AI more reliable visual information.
Crop or straighten before correction
Make the face larger in the frame if the subject is small. Cropping first helps the editor detect eye landmarks more accurately, especially in group photos.
Apply pupil-only red-eye correction
Use an AI editor or retouching tool that targets the pupil rather than the whole eye. The correction should neutralize the red channel without darkening the sclera, iris, or eyelids.
Check both eyes at 100% and 200% zoom
Look for a clean pupil edge, matching pupil darkness, and preserved catchlights. One eye may need less correction than the other if the flash angle was uneven.
Lower strength if the eyes look flat
If the pupil becomes smoky, gray, or completely matte, reduce intensity by roughly 10–30%. Natural eyes usually keep a small highlight and some local contrast.
Export for the final use case
Use PNG or maximum-quality JPG for prints and keepsakes. For social posts, export a high-quality JPG once and avoid repeated re-saving, which can create halos around the corrected pupil.
Which Red-Eye Correction Tool Should You Use?
| Option | Best for | Strength | Watch out for |
|---|---|---|---|
| Pict AI | Fast browser-based portrait cleanup | Quick red-eye correction with simple export options | Review privacy settings before uploading sensitive images |
| Photoshop or Lightroom | Professional portrait sets, event galleries, and print work | Precise manual control, masking, zoom, and batch workflows | More setup time and a learning curve for casual edits |
| Apple Photos or Google Photos | Phone snapshots and family album fixes | Convenient built-in editing on mobile devices | Detection and control vary by device, app version, and image quality |
| Free web editors | One-off fixes without installing software | Fast access from most browsers | Quality, watermarks, export size, and data policies vary widely |
| Manual brush or clone tools | Tiny faces, pets, costume lenses, or unusual reflections | Maximum control over difficult cases | Easy to overpaint catchlights or create mismatched pupils |
For casual photos, choose the fastest tool that preserves catchlights and lets you inspect the pupil at full size. For paid work, client galleries, or large print files, use an editor with manual masking and non-destructive export controls.
What Settings Make AI Red-Eye Correction Look Natural?
- Use a pupil-only instruction: "Remove red-eye from the pupils only. Preserve iris texture, eyelids, eyelashes, skin texture, and catchlights."
- Use a natural portrait instruction: "Correct the red flash reflection while keeping the eyes realistic, softly blended, and consistent with the original lighting."
- Use a group photo instruction: "Scan every visible face for red-eye, correct only affected pupils, and keep unaffected eyes unchanged."
- Use a print-safe instruction: "Avoid flat black pupils, gray eyes, harsh halos, or smudged lashes. Maintain clean edges suitable for a high-resolution print."
- Use a pet-eye instruction: "Reduce green or yellow eye shine while preserving the animal's natural iris shape and reflected highlight."
- A practical strength range is usually moderate, not maximum. If the editor has an intensity slider, start near the middle, zoom in, then adjust downward until the eyes look believable instead of painted.
How Does AI Detect Pupils and Preserve Catchlights?
AI red-eye correction usually starts with face detection and facial landmark models that locate the eyes, eyelids, iris region, and approximate pupil center. The system then looks for a saturated red channel pattern inside a circular or oval pupil boundary and separates it from skin, sclera, lashes, and iris detail.
The better tools use edge-aware filtering, semantic segmentation, and local contrast preservation instead of a simple paint bucket fill. That distinction is important: a realistic fix darkens the flash reflection while keeping the catchlight as a tiny bright reflection. If the catchlight disappears, the eye often reads as lifeless even when the red color is gone.
When Does AI Red-Eye Correction Need Manual Editing?
- Motion blur can hide the pupil boundary, causing the correction to spill into the iris or eyelid.
- Very small faces in wide group photos may need cropping before AI detection works reliably.
- Heavy compression from screenshots, messaging apps, or old web uploads can create halos after recoloring.
- Beauty filters, false lashes, glasses glare, and colored contact lenses can confuse eye segmentation.
How Do You Fix Pet Eye Shine or Green-Eye With AI?
Pet eye shine is similar to red-eye but not identical. Dogs, cats, and other animals often reflect green, yellow, blue, or white light because of the tapetum lucidum, a reflective layer behind the retina. A human red-eye preset may darken the wrong color range or make the animal's eyes look cloudy.
For pets, ask the editor to reduce reflective eye shine rather than remove red-eye only. Keep the natural iris color, keep the small highlight, and avoid replacing the whole eye with black. If both eyes reflect different colors, correct them separately so the final image still looks like the same pet in the same lighting.
What Is the Best Workflow for Prints, Social Posts, and Albums?
For social posts, the fastest safe workflow is crop, correct, zoom-check, then export once as a high-quality JPG. The goal is natural-looking eyes at phone size without introducing visible halos when the image is compressed by Instagram, TikTok, Facebook, or messaging apps.
For gifts, prints, portfolios, and family albums, work from the original file and keep a corrected master copy. Export PNG or maximum-quality JPG, then inspect the eyes at print size. If the photo is emotionally important, such as a wedding table shot, birthday flash photo, or old compact-camera portrait, spend extra time matching pupil darkness between both eyes.
More Pict.AI guides people actually use
Frequently Asked Questions
The fastest method is to upload the image to an AI photo editor, apply pupil-only red-eye correction, then check the eyes at full size before exporting.
Yes. You can use a built-in photo editor when available or a browser-based AI editor to detect the eyes and neutralize the red pupil reflection.
Eyes look gray when the correction is too strong or covers the catchlight and iris texture. Lower the intensity and make sure only the pupil is being corrected.
Yes, if the scan or digital file has enough eye detail. Very low-resolution scans, faded prints, and compressed copies may need manual retouching after AI correction.
AI can fix group photos, but tiny faces may need cropping or manual checking. Scan every face because red-eye can appear in only one person or one eye.
No. Red-eye correction targets a flash reflection inside the pupil, while eye color editing changes the iris color and is usually a more creative alteration.
Use PNG or maximum-quality JPG for prints and keepsakes. Use a high-quality JPG for social media, and avoid repeatedly re-saving the same edited file.
Sometimes, but pet eye shine is often green, yellow, blue, or white instead of red. Use a pet-eye or reflective-eye instruction and preserve the animal's natural iris shape.
Be careful. Official ID and passport photos have strict rules, so only use corrections allowed by the issuing authority and avoid cosmetic or structural changes.