Fix Scratched Old Photos With AI
You can fix scratched old photos with AI by scanning the print, running an image restoration or inpainting tool, and exporting a separate restored copy. The best results come from clean 300-600 dpi scans, light dust removal before scanning, and careful review around faces, text, and borders.
Creating your image...
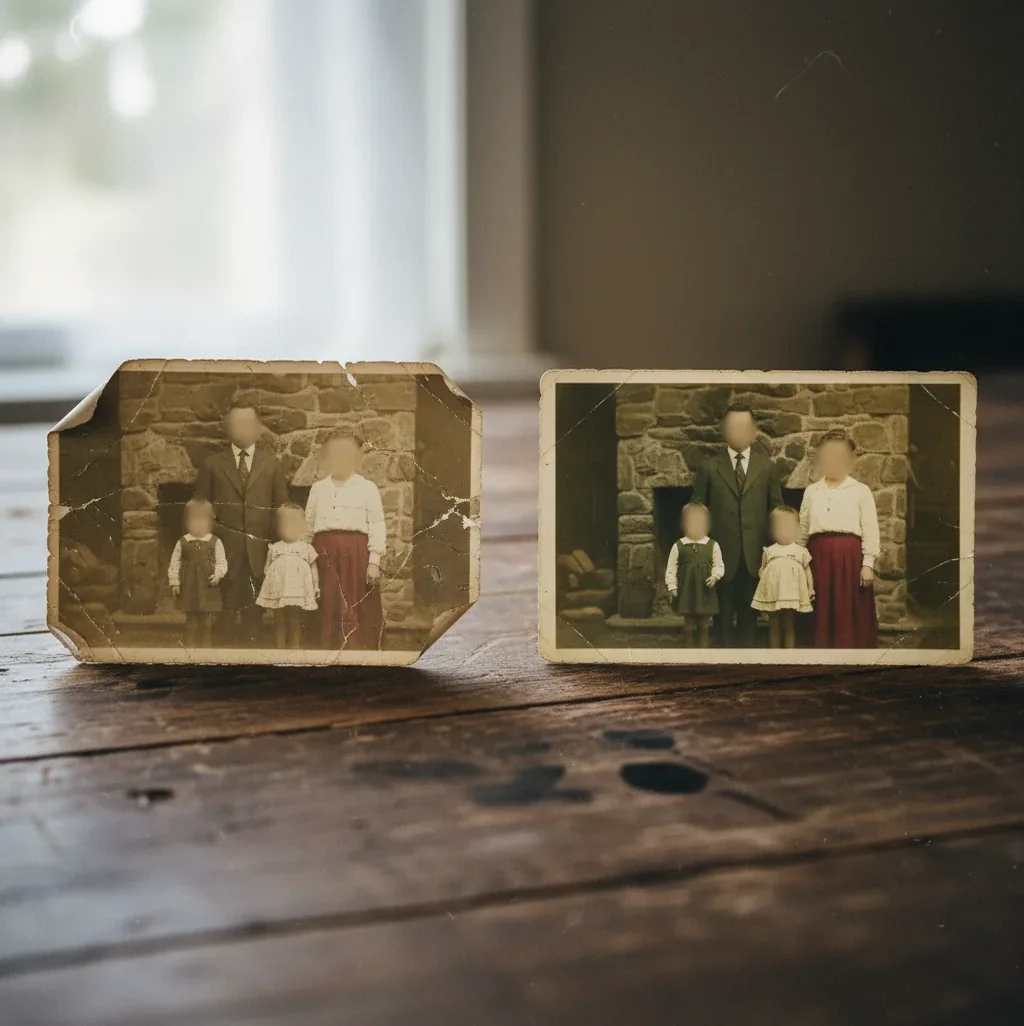
To fix scratched old photos with AI, start with a clean scan, use an AI restoration tool to remove scratches, dust, creases, and small tears, then inspect the result at 100% zoom before exporting. AI can plausibly rebuild missing pixels from nearby texture, but it cannot guarantee historically exact detail when large parts of the image are missing.
What Does It Mean to Fix Scratched Old Photos With AI?
Fixing scratched old photos with AI means using image restoration models to detect visible damage and generate replacement pixels that match the surrounding photo. The repair usually targets white scratches, dust specks, fold creases, pinholes, scuffs, small tears, and worn corners on a scanned or photographed print.
The process is not the same as recovering the original negative. AI restoration is a plausible reconstruction based on texture, grain, edges, shadows, and nearby facial structure. It is useful for family archives, social posts, memorial prints, genealogy projects, gifts, and portfolio cleanup, but the restored image should be treated as an edited copy rather than a perfect historical record.
How Does AI Scratch Repair Rebuild Missing Photo Detail?
AI scratch repair usually relies on inpainting, a computer vision process that fills damaged areas by predicting what should be there from surrounding pixels. The model analyzes local structure such as film grain, skin texture, fabric weave, background tone, hairlines, eye edges, and printed borders, then generates new pixels that continue those patterns across the scratch.
Modern restoration pipelines may combine defect detection, segmentation masks, convolutional feature extraction, diffusion-based generation, and sharpening or denoising passes. This is why a thin scratch across a cheek can often be removed convincingly, while a missing eye, blown-out glare patch, or torn-away face cannot be rebuilt accurately without a reference image. AI needs clean context to copy from.
How Do You Repair Scratches, Tears, and Dust Step by Step?
Scan the print before editing
Use 300 dpi as a minimum for a 4x6 print and 600 dpi for small, faded, or heavily scratched photos. Save the first capture as PNG or TIFF when possible, because repeated JPEG compression can create blocks that restoration tools may mistake for texture.
Clean the scanner and photo gently
Wipe the scanner glass with a microfiber cloth and remove loose dust from the print with a soft brush or air blower. Do not scrub fragile emulsion, glossy surfaces, or cracked paper, because physical cleaning can make the damage worse.
Run an AI restoration pass
Upload the scan to an AI photo restoration tool such as Pict AI, Photoshop, Remini, VanceAI, or another repair editor. Use scratch removal, object removal, or inpainting controls depending on how the tool labels the feature.
Inspect faces and text at 100% zoom
Check eyes, mouths, hands, hairlines, jewelry, handwriting, dates, and uniform details. These areas reveal over-smoothing quickly, especially when scratches cross a face or when old paper texture gets mistaken for noise.
Adjust tone after scratch repair
Do color correction, black-and-white contrast, dehazing, or sharpening after the scratch cleanup. Repairing first gives the enhancement step a cleaner base and reduces the chance of making scratches darker or more visible.
Export a restored copy
Keep the untouched original scan and export the edited version with a clear filename such as family_photo_1948_restored_v2.png. For printing, use the highest-quality export available and avoid resizing too early.
Which Tools Can Restore Scratched Old Photos?
| Tool | Best for | Strengths | Watch out for |
|---|---|---|---|
| Pict AI | Fast browser or iOS restoration for scanned family photos | Simple upload flow, AI cleanup, useful for scratches, creases, dust, and face-area repairs | Large missing areas still need manual judgment or a reference image |
| Adobe Photoshop | Detailed manual restoration and professional retouching | Healing Brush, Clone Stamp, Generative Fill, layers, masks, and color control | Requires more skill and usually takes longer than one-click restoration |
| Remini | Mobile-first face enhancement and quick portrait cleanup | Strong facial sharpening and social-ready outputs | Can over-enhance faces or change natural film texture |
| VanceAI | Web-based enhancement, denoising, and restoration batches | Useful for quick upscaling and cleanup on multiple files | Results vary with low-resolution scans and compression artifacts |
| GIMP or Photopea | Free manual patching and layer-based edits | Good for clone repair, dust cleanup, cropping, and local corrections | Less automated; complex scratches take patience |
Choose a fast AI restoration tool for simple family-photo cleanup, and use a layer-based editor when you need exact control over faces, handwriting, uniforms, jewelry, or historically important details.
What Scan Settings Give AI the Best Restoration Result?
The best scan settings for AI photo restoration are 600 dpi for small prints, 300 dpi minimum for standard 4x6 prints, 24-bit color even for black-and-white photos, and PNG or TIFF export when available. A higher-resolution scan gives the model more real texture to extend across scratches and more edge detail around eyes, mouths, hair, and clothing.
Avoid phone photos unless you cannot scan. If you must use a phone, place the print flat, use indirect daylight, turn off flash, shoot straight down, and avoid glossy glare. Glare is especially harmful because AI may interpret the bright reflection as missing image data and invent incorrect details. The cleaner the capture, the less the model has to guess.
What Prompt Recipes Help With Generative Photo Repair?
- General restoration brief: Restore this scanned vintage family photo by removing scratches, dust, creases, and small tears while preserving the original face shapes, film grain, clothing texture, and black-and-white tonal range.
- Face-safe repair prompt: Repair only the visible scratches crossing the face. Preserve the person’s identity, eye shape, mouth shape, skin texture, age lines, hairline, and natural film grain. Do not beautify or change facial features.
- Print-ready cleanup prompt: Clean surface damage and balance contrast for an 8x10 print. Keep the original composition, border, paper texture, and period look. Avoid plastic skin, heavy sharpening, or modern color grading.
- Archive version prompt: Create a conservative restoration suitable for a family archive. Remove dust and obvious scratch marks, but preserve age, grain, faded tones, handwritten marks, and historically meaningful imperfections.
- Missing-corner prompt: Reconstruct the small missing corner using only the nearby background, border, and paper tone. Do not invent people, text, objects, or scenery not supported by the surrounding image.
Where Does AI Restoration Help Most?
- Removing thin white scratches across faces, clothing, skies, studio backdrops, and dark photo borders.
- Cleaning dust, lint, scanner specks, pinholes, and small surface scuffs from scanned prints.
- Reducing fold creases on snapshots, yearbook photos, military portraits, school portraits, and wallet-size photos.
- Repairing small torn corners when the missing area contains simple background, border, wall, sky, or floor texture.
- Preparing images for family albums, memorial slideshows, genealogy trees, social posts, framed gifts, and reprints.
- Creating a clean base before optional colorization, upscaling, cropping, background extension, or print layout.
When Does AI Fail on Scratched or Damaged Prints?
- AI cannot accurately recover large missing areas if the original detail is gone and there is no reference image.
- Glossy glare, scanner reflections, and silvering on old prints can be mistaken for scratches and repaired incorrectly.
- Low-resolution phone photos limit detail recovery, especially around eyes, teeth, handwriting, medals, and printed dates.
- Heavy stains, ink marks, mold, tape residue, or chemical damage may turn into smeared patches after automated repair.
How Do You Keep an AI-Restored Photo Honest?
Keep an AI-restored photo honest by preserving the original scan, exporting the repair as a separate file, and labeling the edit clearly. For family history, a practical naming system is original, restored, and print versions, such as smith_wedding_1952_scan.tif, smith_wedding_1952_restored.png, and smith_wedding_1952_print.jpg.
Use conservative restoration when the photo has historical value. Remove scratches that block viewing, but avoid changing faces, clothing, badges, handwritten dates, background signs, or objects that carry meaning. A good restoration should feel like the photo was carefully cleaned, not like the person was re-created in a new era.
If you're repairing photos, these guides pair well
Frequently Asked Questions
Yes. AI can remove many scratches from old photos by using surrounding pixels to fill damaged areas, especially when the photo is scanned clearly at 300-600 dpi.
Use 300 dpi as a minimum for standard prints and 600 dpi for small, faded, or heavily damaged photos. Higher resolution gives the AI more texture and edge detail to work with.
TIFF or PNG is best because these formats preserve more detail and avoid extra compression artifacts. JPEG can work, but repeated JPEG saves may reduce restoration quality.
AI can plausibly repair small torn corners when the missing area contains simple background or border texture. Large missing corners with faces, text, or important objects usually need manual retouching or reference photos.
It can if the tool over-enhances or guesses too much around eyes, mouths, and skin. Always review faces at 100% zoom and use conservative settings when preserving identity matters.
Yes, but a flatbed scan usually works better. If using a phone, shoot straight down in soft indirect light, avoid flash, and keep the print flat to reduce glare and distortion.
Yes. Most AI restoration tools can reduce dust, lint, crease lines, and small scuffs, though deep folds and missing emulsion may still leave visible artifacts.
AI restoration is useful for readable viewing copies, but it is not a guaranteed historical reconstruction. Keep the untouched scan and label restored versions clearly.
The tool likely applied too much denoising, face enhancement, or sharpening. Reduce enhancement strength, restore from a higher-quality scan, or add back subtle grain for a more natural print look.