Make Selfies Look Professional With AI
You can make selfies look professional with AI by correcting exposure, neutralizing color, cleaning the background, and applying light face-aware retouching. The best result looks like a polished headshot, not a beauty filter.
Creating your image...
To make selfies look professional with AI, start with a sharp, well-lit selfie and use AI tools to fix exposure, white balance, background clutter, and small skin distractions. Keep skin texture, facial proportions, and hair edges natural so the image reads as a believable headshot. Export in 4:5 for social profiles or 1:1 for avatars at the highest available quality.
What Does It Mean to Make a Selfie Look Professional With AI?
Making a selfie look professional with AI means turning a casual phone photo into a cleaner, headshot-style portrait without changing the person’s identity. The core edits are exposure correction, white balance, background simplification, subtle skin cleanup, and selective sharpening around the eyes, brows, and hairline. A professional AI selfie should still show real pores, natural face shape, and believable lighting. It should not look like a synthetic glamour portrait, a face swap, or a heavily smoothed beauty filter. The goal is practical: a profile photo that works for LinkedIn, resumes, portfolios, creator bios, dating apps, team directories, and speaker pages.
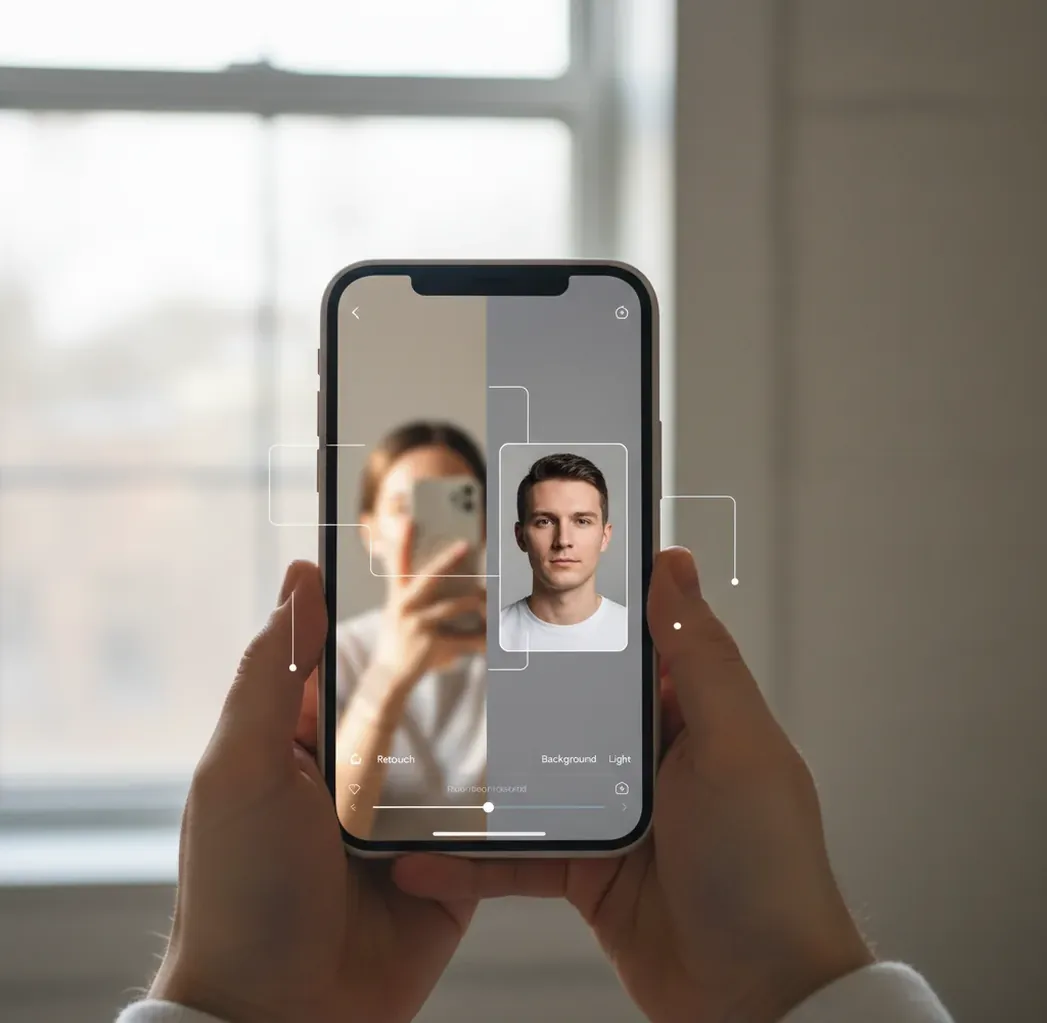
How Does AI Turn a Casual Selfie Into a Headshot?
AI selfie editors use face detection, facial landmarking, semantic segmentation, and generative inpainting to decide what to adjust. Landmarking locates features such as eyes, nose, lips, jawline, brows, and hairline, while segmentation separates skin, hair, clothing, and background. That lets the software brighten the face, reduce under-eye shadows, remove small distractions, blur or replace the background, and sharpen key facial details without applying the same edit everywhere. The best results come from layered corrections: global tone first, color balance second, background cleanup third, and face-aware retouching last. If the source image is blurry, extremely dark, or distorted by a wide-angle lens, the model has less reliable detail to preserve.
How Do You Make Selfies Look Professional With AI?
Choose a sharp, evenly lit selfie
Pick a front-facing photo taken near a window or soft light source. Keep the camera near eye level and avoid extreme wide-angle closeups that stretch the nose, forehead, or jaw.
Correct exposure before retouching
Lower harsh highlights, lift shadows gently, and keep contrast natural. A face that is too bright will look flat after retouching, while a face that is too dark can become noisy or artificial.
Neutralize white balance
Adjust color temperature until skin looks believable and the whites of the eyes are neutral, not blue, orange, green, or gray. This step often makes the biggest difference.
Simplify the background
Remove clutter, soften a busy room, or replace the background with a plain studio-like color. A subtle blur usually looks more natural than a hard cutout.
Retouch only temporary distractions
Remove lint, flyaway distractions, acne spots, under-eye darkness, or shine, but keep pores, smile lines, freckles, and natural skin texture. Do not reshape the face for identity-based uses.
Export for the final platform
Use 4:5 for many social profiles, 1:1 for avatars, and a high-resolution export for websites or print. Keep the eyes near the upper third and leave some shoulder space.
Which Tools Are Best for Professional Selfie Edits?
| Tool | Best for | Strength | Watch out for |
|---|---|---|---|
| Pict AI | Fast browser and iOS selfie-to-headshot edits | Face-aware cleanup, background control, profile-friendly export sizes | As with any AI editor, heavy retouching can look unnatural |
| Canva | Profile graphics, resumes, and social templates | Easy cropping, background removal, and brand layouts | Portrait retouching controls are lighter than dedicated photo editors |
| Adobe Lightroom | Manual tone, color, and detail control | Strong exposure, masking, color grading, and export options | Takes more time and assumes some editing knowledge |
| Photoshop | Precise cleanup and advanced compositing | Best for manual skin work, hair edges, and controlled background edits | Overkill for a quick profile photo unless precision is needed |
| Facetune | Mobile portrait polishing | Quick blemish cleanup, smoothing, and face-focused tools | Easy to over-smooth skin or change facial structure too much |
| Remini | Improving low-resolution or soft portraits | AI enhancement can recover perceived sharpness | May invent facial detail if the original photo is too blurry |
Choose the tool based on the bottleneck in your selfie. If the issue is light and color, use a photo editor with strong tone controls; if the issue is background clutter, use background removal or blur; if the issue is small facial distractions, use a face-aware retouching tool.
What Settings Make an AI Selfie Look Natural?
Natural AI selfie edits usually use low-to-moderate strength settings instead of maximum sliders. Keep skin smoothing below the point where pores disappear at 100% zoom, sharpen eyes and brows selectively, and avoid whitening teeth or eyes beyond the original lighting. For color, aim for neutral skin rather than trendy orange, pink, or gray grading. For backgrounds, use a soft office wall, studio gray, muted beige, or shallow depth-of-field blur. The emotional utility is simple: the photo should feel like you on a good-light day, ready for a profile, portfolio, speaker page, press kit, social post, or printed bio card.
What Prompt Recipes Work Best for Professional Selfies?
Use edit instructions that describe cleanup, lighting, and restraint rather than asking the AI to make you look perfect. Strong prompt recipe: "Turn this selfie into a natural professional headshot. Correct exposure and white balance, clean the background, reduce temporary blemishes and shine, keep real skin texture, preserve my face shape, and crop for a 4:5 profile photo." For LinkedIn, use: "Create a clean business profile portrait with soft daylight, neutral background, natural skin texture, sharp eyes, and no face reshaping." For creator branding, use: "Polish this selfie for a creator profile image with clean color, subtle contrast, soft background separation, and an approachable expression."
Where Can You Use a Polished AI Selfie?
A polished AI selfie works anywhere you need a clean portrait but do not need a formal studio shoot. Common uses include LinkedIn profile photos, resume headers, portfolio bios, team directories, Slack or Notion avatars, creator profile images, YouTube channel pages, podcast artwork, conference speaker pages, press kits, dating apps, and small printed materials. Match the edit to the context: business profiles need neutral backgrounds and restrained retouching; creator profiles can use stronger color style; dating photos should stay especially natural; printed portraits need higher resolution and less aggressive sharpening because print reveals halos and waxy texture.
When Will AI Not Fix a Selfie?
- Motion blur cannot be fully repaired because the original edge detail is missing; AI sharpening may create gritty skin or invented eyelashes.
- Extreme wide-angle distortion from a close front camera can stretch facial proportions in ways that look unnatural after correction.
- Harsh top-down lighting creates deep eye sockets, nose shadows, and forehead shine that are difficult to balance without flattening the face.
- Very low-resolution images may look acceptable as tiny avatars but can fall apart on portfolio pages, press kits, or prints.
Frequently Asked Questions
Use AI to correct exposure, neutralize color, clean the background, lightly retouch temporary distractions, and crop the image like a headshot. Keep the edit subtle so the photo still looks like you.
AI can improve lighting, color, background, and small distractions, but it cannot fully fix severe blur, extreme shadows, or strong lens distortion. Start with the sharpest and most evenly lit selfie you have.
Use 4:5 for many social and professional platforms and 1:1 for avatars. Place the eyes near the upper third of the frame and include a small amount of shoulder space.
A soft blur is usually safer because it preserves natural hair edges and lighting. Full background replacement works best when the original background is simple and the subject has clear edges.
Keep skin texture, avoid face reshaping, use moderate smoothing, and do not over-whiten eyes or teeth. Natural lighting and believable color matter more than perfect skin.
Soft front-facing daylight is best, especially near a window. Avoid overhead bathroom lights, harsh noon sun, and mixed lighting from lamps and screens.
Yes, if the image is accurate, natural, and professional-looking. Use a clean background, neutral color, and restrained retouching so it reads as a real portrait.
Export at the highest quality available, ideally at least 1080 pixels on the long edge for web use. For print or press materials, use a larger file with minimal compression.
Yes, removing temporary distractions like blemishes, lint, or shine is generally fine. Avoid changing permanent facial features if the photo is meant to represent your real identity.