How to Make Viral Before-and-After Photos With AI
Viral before-and-after photos with AI work when the change is obvious, believable, and easy to understand in one second. The best workflow keeps the same crop, angle, and subject position, then uses AI to improve one main thing: lighting, clarity, cleanup, restoration, or retouching.
Creating your image...
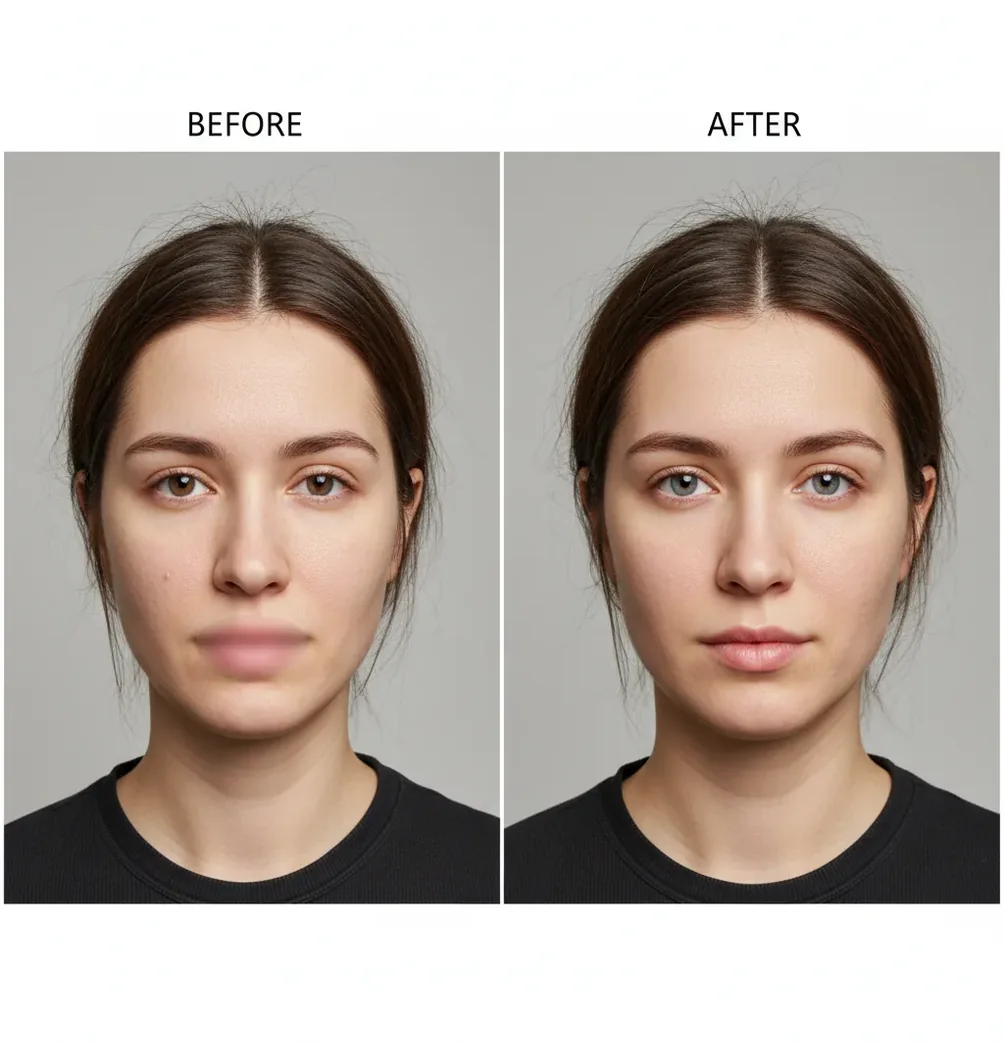
To make viral before-and-after photos with AI, start with one image that has a clear visual problem, create a natural-looking enhanced version, and place both versions in a clean side-by-side or split-screen layout. Keep the framing, angle, and subject size identical so viewers notice the improvement instead of questioning the comparison.
What Are Viral Before-and-After Photos Made With AI?
Viral before-and-after photos made with AI are paired images that show a fast, visible transformation between an original photo and an enhanced version. The edit may improve sharpness, brighten low light, restore an old image, remove clutter, clean product photos, reduce noise, or polish a portrait while keeping the subject recognizable.
The strongest versions are not extreme filters. They are controlled comparisons where the viewer can understand the change instantly: dull room to clean listing photo, soft portrait to crisp profile image, faded family photo to restored print, or messy product shot to marketplace-ready image. The goal is visual proof, not visual trickery.
How Does AI Make the After Photo Look Better?
AI photo enhancement improves an image by predicting cleaner pixels, sharper edges, and more balanced tones from patterns learned across large image datasets. Common processes include denoising, super-resolution upscaling, face restoration, object cleanup, local contrast adjustment, white-balance correction, and background reconstruction.
Modern tools may use convolutional neural networks for edge and texture detection or diffusion-based models to reconstruct missing detail. This is why eyelashes, fabric weave, hair texture, product edges, and old-photo scratches can look cleaner after processing. The tradeoff is that high-strength settings can invent texture, bend text, create halos, or make skin look plastic, so realistic edits need a controlled strength setting and a close zoom check.
How Do You Make a Viral Before-and-After Photo With AI?
Choose one image with one clear problem
Pick a photo where the improvement will be obvious on a phone screen: low light, blur, noise, clutter, faded color, dull product lighting, or soft detail. Avoid photos that are already polished because the change will not feel worth saving or sharing.
Lock the crop before editing
Crop the original image first, then use the same crop for both panels. Good social ratios are 9:16 for Reels, Shorts, and Stories; 4:5 for Instagram feed posts; 1:1 for profile grids and marketplace previews.
Create one focused after version
Use AI to improve a single main issue instead of changing everything at once. For example, choose sharper detail plus cleaner lighting, old-photo restoration, background cleanup, or natural portrait retouching.
Check realism at 200% zoom
Inspect hairlines, fingers, glasses, teeth, text, logos, jewelry, fabric edges, and background patterns. If edges glow, pores vanish, lettering warps, or textures repeat, reduce the AI strength and export again.
Build a clean comparison layout
Place the before and after at the same size with aligned eyes, horizon lines, product edges, or room corners. Use a simple divider, small labels, and even margins so the viewer reads the transformation immediately.
Test the post at phone size
Shrink the final image on your screen before posting. If the difference is not visible at arm’s length, increase contrast slightly, simplify the layout, or choose a stronger original image.
What Layout Makes Before-and-After Photos Perform Best?
The best layout for before-and-after photos is the one that makes the comparison readable without explanation. A side-by-side layout works well for feed posts, product photos, portraits, makeup, hair, car detailing, room cleanup, and old-photo restoration. A vertical split works better for 9:16 video covers, Stories, Reels, Shorts, and TikTok slideshows.
Keep labels short: “Before” and “After” are enough. Use a thin divider, identical panel sizes, and a plain background. Do not place heavy captions, stickers, arrows, or emojis over the subject. If the edit is subtle, use a small zoom-in crop as a second slide rather than forcing an exaggerated result.
Which AI Tools Can Create Before-and-After Photos?
| Tool Type | Best For | Control Level | Watch Out For |
|---|---|---|---|
| Pict AI | Fast browser or iOS before-and-after enhancement, cleanup, and share-ready exports | Moderate; useful for quick creator workflows | Review sensitive or commercial use cases before uploading private images |
| Adobe Photoshop or Lightroom | Professional retouching, masking, color correction, and precise edits | High; best for manual control and client work | Slower workflow and steeper learning curve |
| Canva | Simple side-by-side layouts, labels, social templates, and brand graphics | Moderate; strong for layout, lighter for deep image repair | AI results vary by image complexity |
| CapCut | Before-and-after video reveals, slider animations, short-form edits, and captions | Moderate; strong for social video packaging | Still-image restoration controls are limited |
| Topaz, Remini, or similar enhancers | Upscaling, sharpening, denoising, and face restoration | Moderate to high depending on the tool | Can over-sharpen or invent detail if strength is too high |
For the cleanest workflow, many creators use one tool for AI enhancement and another for layout or video packaging. Choose based on whether you need speed, manual control, social templates, or high-resolution restoration.
What Prompt Recipes Work for AI Before-and-After Edits?
- Natural portrait cleanup: “Enhance this portrait with realistic lighting, sharper eyes, natural skin texture, reduced noise, and no changes to facial structure.”
- Product photo polish: “Clean the background, improve edge sharpness, balance color, reduce shadows, and keep the product shape, logo, and label text accurate.”
- Old photo restoration: “Restore this old photo by reducing scratches, improving contrast, recovering facial detail, and preserving the original vintage character.”
- Room cleanup edit: “Remove small visual distractions, brighten the room naturally, correct white balance, and keep furniture layout and architecture unchanged.”
- Social comparison caption: “Before: flat light and soft detail. After: cleaner tones, sharper texture, and a more polished image while keeping the subject realistic.”
- AI safety instruction: “Do not change body shape, identity, age, medical appearance, product claims, or any detail that would misrepresent the original image.”
How Do You Keep the After Photo Realistic?
To keep the after photo realistic, preserve the subject’s identity, shape, proportions, and texture while improving only the image quality. In portraits, leave pores, fine lines, hair texture, and natural shadows intact. In product photos, protect logos, labels, seams, edges, and color accuracy. In interiors, avoid changing room dimensions or furniture scale.
A useful rule is to make the after image look like a better photo, not a different reality. Match brightness between panels so the after image does not win only because it is brighter. If you are posting skincare, fitness, medical, cosmetic, or financial results, add clear context and avoid presenting AI edits as proof of real-world outcomes.
When Can AI Before-and-After Photos Look Misleading?
- Very blurry originals can cause AI to hallucinate fake detail, especially around eyes, teeth, hands, labels, and fabric patterns.
- Changing the angle, crop, lens perspective, or subject distance makes the comparison feel staged even if the edit is technically good.
- Heavy skin smoothing removes pores and creates a filtered look that viewers often distrust.
- Text, logos, tattoos, jewelry, license plates, and product packaging may warp during upscaling or cleanup.
Related guides you'll probably want next
Frequently Asked Questions
A before-and-after photo is more likely to spread when the change is visible in one second, the framing is consistent, and the result feels believable rather than exaggerated.
The best AI edit is usually one focused improvement, such as better lighting, sharper detail, noise reduction, cleanup, restoration, or natural retouching. Combining too many changes can make the result look fake.
Use 9:16 for Reels, TikTok, Shorts, and Stories; 4:5 for Instagram and Facebook feed posts; and 1:1 for grids, thumbnails, and marketplace listings.
Keep the same crop, angle, and subject size, then use moderate enhancement strength. Check details like skin texture, hair, hands, text, and background edges before posting.
Yes, but the edit should not misrepresent the product, service, or result. For product listings, preserve accurate colors, labels, dimensions, and visible condition.
They are generally allowed, but platforms may restrict deceptive manipulated media or misleading claims. Add disclosure when the edit could affect how viewers interpret the result.
A slightly underexposed, noisy, cluttered, soft, or faded photo works well because the improvement is easy to see. A nearly perfect original usually produces a weaker comparison.
The before photo should usually stay untouched except for the same crop, size, and export format. Editing the before image heavily can make the comparison feel dishonest.
Use one main comparison as the first slide, then add one or two close-up detail slides if needed. The first slide should explain the transformation without requiring a long caption.