How to Remove Under-Eye Bags From Photos With AI
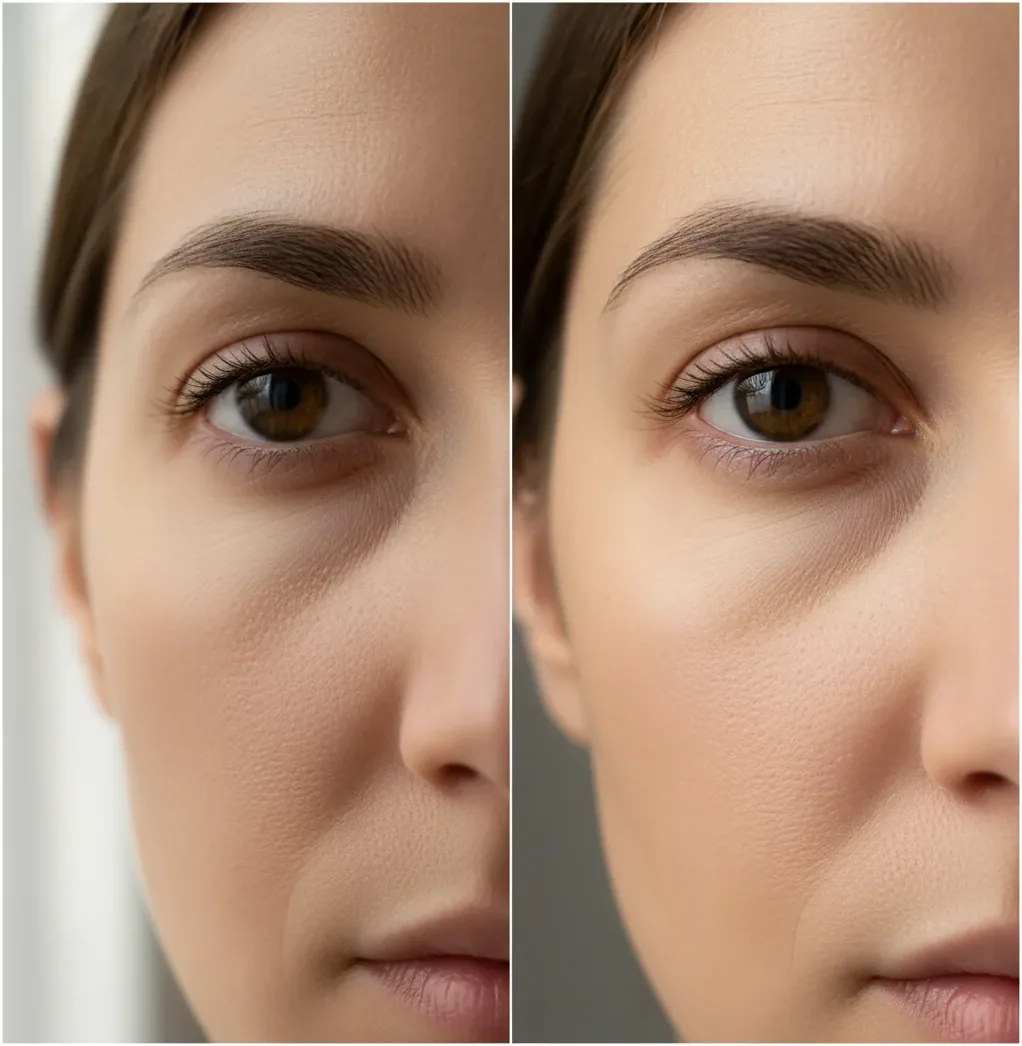
AI under-eye retouching reduces the dark shadows, puffiness cues, and tired-looking contrast that lighting can exaggerate in portraits. The best results come from a light, localized edit that keeps pores, fine lines, and face shape intact.
Creating your image...
To remove under-eye bags from photos with AI, upload a sharp portrait, target only the under-eye area, and apply a low-strength correction that softens shadows and puffiness without blurring skin texture. AI works best on lighting-related dark circles and mild puffiness; deep hollows, heavy reflections, or low-resolution selfies may still need manual retouching.
What Does It Mean to Remove Under-Eye Bags With AI?
Removing under-eye bags with AI means using face-aware photo editing to reduce the visual signs of tiredness under the eyes, especially shadow contrast, cool-toned dark circles, and mild puffiness. Instead of applying a beauty filter to the entire face, the editor detects the eye region and adjusts a small zone below the lower eyelid.
A good AI under-eye edit preserves high-frequency skin detail, including pores, fine lines, and natural texture. The goal is not to erase every crease or reshape the face; it is to make the photo look closer to how the person appeared in normal lighting. This is useful for selfies, headshots, profile photos, creator thumbnails, family portraits, gifts, and printed photos where overhead light made the under-eye area look harsher than it felt in real life.
How Does AI Reduce Puffiness, Dark Circles, and Shadows?
AI reduces under-eye bags by separating local shadow and contour from the surrounding skin texture. Most modern retouching systems use facial landmarks to locate the eyes, lower eyelids, cheek transition, and tear-trough area, then apply localized correction instead of global smoothing.
Technically, the edit may combine segmentation, inpainting, tone mapping, color correction, and texture-preserving blending. Dark circles are usually treated as a color and luminance problem, while puffiness is treated as a shape-and-shadow problem. That is why AI often handles gray, blue, or brown under-eye shadows more cleanly than deep structural hollows. The strongest edits keep the correction subtle enough that the face still has real dimension.
How Do You Remove Under-Eye Bags Without Making Skin Look Fake?
Choose the sharpest photo
Start with the highest-resolution version of the portrait. Avoid screenshots, heavily compressed social-media downloads, motion blur, and photos where the under-eye area is hidden by glare or hair.
Upload the image to an AI photo editor
Use a portrait retouching tool that supports localized face edits. Pict AI, Photoshop, Lightroom, Facetune, and browser-based retouchers can all work depending on how much control you need.
Zoom in and inspect each eye separately
Check whether one side is darker because of window light, flash, glasses, or overhead lighting. Under-eye shadows are often uneven, so both eyes may not need the same strength.
Apply a light under-eye correction
Reduce the shadow until the tired look softens, not until the skin becomes flat. If there is a strength slider, start around 20% to 40% and increase only if the texture still looks natural.
Compare at normal viewing size
Toggle before and after at 100% zoom, then zoom out to phone-screen or feed size. An edit that looks clean close-up can look too bright or mismatched in the full portrait.
Export without extra beauty filters
Avoid stacking skin smoothing, face reshaping, and under-eye correction unless the image is intentionally stylized. For professional headshots and prints, natural texture matters more than total smoothness.
What Is the Best Tool for AI Under-Eye Retouching?
| Tool type | Best for | Strengths | Watch-outs |
|---|---|---|---|
| Pict AI | Fast browser or iOS portrait cleanup | Simple localized retouching for selfies, profile photos, and social posts | Like any online AI editor, results depend on upload quality, lighting, and face visibility |
| Photoshop or Lightroom | Professional portrait retouching and print work | Precise masks, healing tools, curves, frequency separation, and non-destructive editing | Slower workflow and steeper learning curve |
| Facetune-style mobile editors | Quick phone edits before posting | Easy sliders, face-aware tools, and fast before/after checks | Can look over-smoothed if multiple beauty tools are stacked |
| Free web retouchers | One-off edits with minimal setup | Convenient for simple shadow reduction on casual photos | May add watermarks, compress exports, or offer limited control |
| Manual clone/heal tools | Fixing small creases, makeup texture, or asymmetry | High control over exact pixels and blend edges | Requires retouching skill and can look patchy if overused |
For casual selfies, an AI retoucher is usually fastest. For portfolio headshots, commercial campaigns, or large prints, manual masking and non-destructive editing give more predictable control.
What Prompt Can You Use to Fix Under-Eye Bags Naturally?
- Natural selfie cleanup: "Reduce the under-eye shadows slightly while preserving pores, fine lines, eyelashes, and the original face shape. Keep the edit realistic and avoid plastic skin."
- Professional headshot: "Soften under-eye darkness caused by overhead lighting. Maintain natural skin texture, cheek contours, and age-appropriate lines. Do not brighten the whites of the eyes excessively."
- Makeup-aware edit: "Even out the under-eye area without removing concealer texture or changing the makeup style. Reduce gray-blue shadow only where it looks like harsh lighting."
- Asymmetrical lighting fix: "Correct the darker under-eye area more than the brighter side so both eyes match the same lighting environment. Keep the face dimensional."
- Print-safe retouch: "Make a subtle under-eye correction suitable for a high-resolution print. Preserve texture at 100% zoom and avoid smoothing the cheeks or forehead."
When Should You Edit Under-Eye Bags in a Photo?
Edit under-eye bags when the photo is useful but the lighting tells the wrong story. Common cases include LinkedIn headshots shot under office lights, dating profile photos taken after travel, wedding guest selfies under reception spotlights, family portraits where one person caught harsh shadow, and creator thumbnails where tired-looking eyes distract from the message.
This kind of retouching is also helpful for personal keepsakes, graduation photos, branding images, speaker bios, and social posts where you want a polished but recognizable version of yourself. For skincare progress photos, beauty content, or medical-adjacent images, disclose retouching if the edit could affect how viewers interpret the result.
Where Do AI Under-Eye Edits Look Wrong?
- Low-resolution selfies can create blotchy gradients because the model has too little real skin texture to preserve.
- JPEG compression blocks often become more visible after the under-eye area is brightened.
- Strong side-light may cause one eye to look corrected while the other still looks shadowed.
- Glasses reflections can confuse the model about where the lower eyelid and cheek actually begin.
How Do You Keep an Under-Eye Edit Looking Real?
Keep an under-eye edit realistic by correcting the first impression of tiredness rather than erasing every line. A believable portrait still has texture, soft creases, and a natural transition from the lower eyelid into the cheek. If the under-eye area becomes brighter than the forehead or cheekbone, the edit has gone too far.
Work in small passes and check the image at three sizes: close-up, full-frame, and the final use size. A dating profile photo, a 9:16 story, a square avatar, and a large print all reveal different artifacts. For most portraits, subtle shadow reduction plus mild color balancing looks better than heavy smoothing.
Frequently Asked Questions
Yes. AI can reduce the appearance of under-eye bags by softening shadows, balancing color, and lightly blending the under-eye area while preserving skin texture.
Use a localized under-eye retouch tool, apply a low-strength correction, and compare the result before and after at normal viewing size. Avoid full-face smoothing if you only need to fix dark circles.
A targeted under-eye edit usually looks more natural than a full beauty filter. Beauty filters often smooth the whole face, which can remove pores and make the portrait look artificial.
Patchiness usually comes from low resolution, JPEG compression, harsh mixed lighting, or over-smoothing. The editor has less clean texture to blend, so the under-eye gradient can look uneven.
AI usually fixes dark circles more reliably because they are mostly tone and color. Puffiness is partly shape and shadow, so severe bags or deep hollows are harder to remove naturally.
Start low, around 20% to 40% if the tool has a strength slider. Increase only until the tired shadow softens while pores and fine lines remain visible.
Yes, but results depend on scan quality, focus, and grain. Old or compressed photos may need manual cleanup after AI retouching to avoid blotchy skin.
Yes, subtle under-eye retouching is common in professional portraits. The edit should make lighting less distracting without changing the person’s identity or natural facial structure.
A light AI correction should not change face shape. Heavy edits can flatten the cheek area or alter the lower eyelid, so always compare the final image with the original.