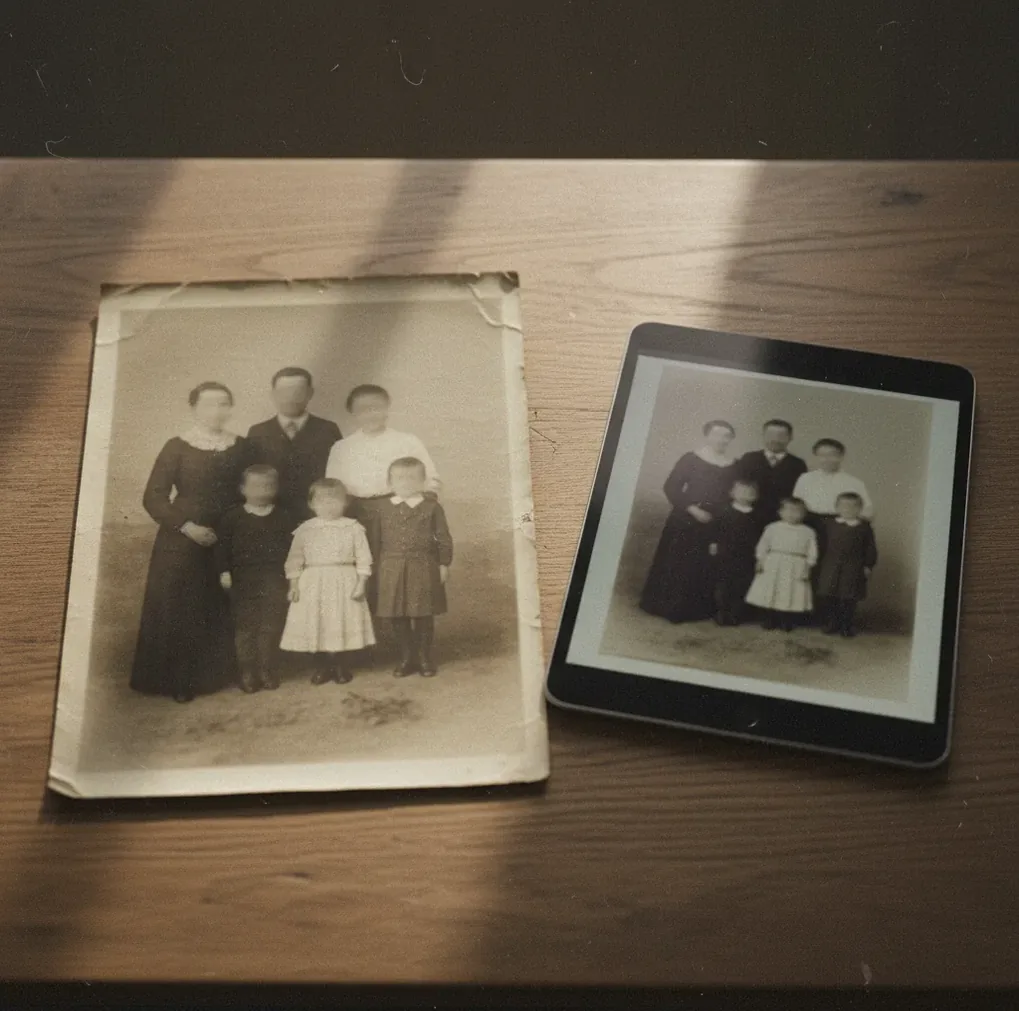
How to Revive a Blurry Old Portrait With AI
You can revive a blurry old portrait with AI by starting with a high-resolution scan, reducing blur and noise gently, and comparing the result against the original print. The goal is not to make the face look modern or synthetic; it is to recover readable eyes, hairlines, fabric, and tonal depth while keeping the character of the original photograph.
Creating your image...
To revive a blurry old portrait with AI, scan the print at 600 DPI or higher, upload the cleanest version to an AI restoration tool, apply light deblurring and denoising, then check the face at 100% zoom before exporting. AI works best on mild to moderate blur, but severe motion blur, tiny faces, and missing photo emulsion may require manual retouching because the original detail is no longer present.
What Does It Mean to Revive a Blurry Old Portrait With AI?
Reviving a blurry old portrait with AI means improving facial readability without erasing the photograph’s age, paper texture, or emotional character. The process usually combines deblurring, denoising, contrast recovery, and face-aware detail reconstruction so eyes, lips, hairlines, collars, and background edges look clearer.
A good restoration should still feel like the same family portrait, studio print, yearbook photo, or memorial image. AI can estimate lost edges, but it should not invent a new expression, change the person’s identity, or turn skin into smooth plastic. The best results come from a clean scan and conservative edits.
How Does AI Unblur an Old Portrait Without Just Sharpening It?
AI deblurring is different from ordinary sharpening because it tries to reconstruct likely missing structure, not just increase edge contrast. Traditional sharpening boosts local contrast around existing pixels, which can create halos along jawlines, glasses, collars, and hat brims. AI models use computer vision, feature extraction, and face-aware priors to estimate where softened facial edges probably belong.
In practice, the model looks for patterns such as eyelids, nostrils, lips, hair direction, fabric weave, and film grain. Then it strengthens those features while reducing scanner noise or haze. This is why gentle AI restoration often looks more natural than stacking multiple sharpen filters in a photo editor.
How Do You Scan an Old Portrait Before AI Restoration?
Clean the glass and the print
Dust on the scanner glass becomes false texture that AI may sharpen. Use a microfiber cloth on the glass and gently brush loose dust from the print without rubbing fragile paper.
Scan at 600 DPI or higher
For most portraits, 600 DPI gives AI enough pixel detail to rebuild eyes, hairlines, and clothing edges. If the original is very small, scan at 1200 DPI.
Save as PNG or TIFF
Avoid starting from a compressed JPEG if possible. PNG and TIFF preserve tonal transitions, grain, and fine detail better than heavily compressed files.
Keep one untouched master copy
Before cropping, retouching, or unblurring, save a clean original scan. This gives you a reference for identity, expression, contrast, and historical texture.
Crop a working version
Make a duplicate crop of the face and shoulders for restoration. Keep the full-frame scan separately if you need to preserve borders, handwritten notes, or studio mount details.
How Do You Restore a Blurry Vintage Portrait Step by Step?
Upload the cleanest scan
Start with the highest-resolution PNG or TIFF available. If you only have a phone photo, shoot in soft window light, keep the camera parallel to the print, and avoid glare.
Apply mild deblur first
Use the lowest unblur strength that makes the eyes, mouth, and hairline easier to read. Avoid maximum settings on the first pass.
Reduce noise lightly
Use denoise only enough to calm scanner speckles, haze, or coarse grain. Leave some original texture so the face does not become waxy.
Adjust tone and contrast
Lift muddy shadows, protect bright forehead and cheek highlights, and add midtone contrast slowly. Old portraits often need tonal recovery more than aggressive sharpness.
Compare at 100% zoom
Check the restored version beside the original. If eyelashes, teeth, catchlights, or hair strands appear that were not supported by the scan, reduce the effect.
Export for the final use
Export a high-resolution version for printing and a smaller JPEG for messaging, social posts, family archives, memorial slideshows, or reunion boards.
Which AI Tools Work Best for Old Portrait Restoration?
| Tool | Best for | Strengths | Watch out for |
|---|---|---|---|
| Pict AI | Fast browser or iOS portrait unblur | Simple workflow for old scans, face clarity, light denoise, and quick exports | Review results closely if the source face is tiny, angled, or heavily compressed |
| Adobe Photoshop | Manual restoration and professional retouching | Precise masking, healing, curves, neural filters, and print preparation | Requires more skill and time than one-click restoration tools |
| Topaz Photo AI | High-resolution enhancement and noise reduction | Strong sharpening, upscaling, and denoise controls for larger files | Can over-process faces if strength settings are too high |
| Remini | Quick face enhancement on mobile | Fast results for casual sharing and social posts | May create a modernized or beautified face that differs from the original |
| GFPGAN or CodeFormer | Open-source face restoration experiments | Useful for technical users who want model control | Can hallucinate facial details and needs setup or hosted access |
Choose the tool based on the final use. A family archive needs conservative restoration, a wall print needs resolution and tonal control, and a social post may only need a quick face clarity pass.
What Settings Keep Restored Skin From Looking Plastic?
To keep restored skin natural, use less denoise than you think and preserve a small amount of grain. Old studio portraits, sepia prints, and black-and-white album photos usually contain paper texture, film grain, soft lens falloff, and uneven tonal transitions. Removing all of that makes the portrait feel synthetic.
Use the eyes as your sharpness anchor, not the cheeks. If the eyes become clearer but pores, freckles, moles, or wrinkles disappear, the denoise setting is too strong. If a bright outline appears around the nose, jaw, collar, or hair, the deblur or sharpening pass is too aggressive.
What Prompt Recipes Help Natural Portrait Restoration?
- Conservative family archive prompt: "Restore this old portrait gently. Reduce blur and haze, improve eye and hairline clarity, preserve wrinkles, freckles, film grain, paper texture, and the original facial identity. Do not beautify or modernize the face."
- Print-ready portrait prompt: "Clean this vintage portrait for an 8x10 print. Improve contrast, reduce scanner noise, sharpen facial edges lightly, preserve natural skin texture, and avoid halos around the hair, collar, and glasses."
- Memorial card prompt: "Make this old portrait clearer and softer for a memorial card. Keep the expression unchanged, restore facial readability, balance shadows and highlights, and avoid exaggerated detail or artificial eyes."
- Black-and-white portrait prompt: "Restore this black-and-white portrait with natural grayscale tonality. Reduce blur and dust, keep film grain, protect highlight detail on the face, and avoid colorizing or changing the person’s features."
- Sepia portrait prompt: "Enhance this sepia portrait while preserving its warm aged-paper look. Improve face clarity and contrast, reduce haze, keep the original tint, and avoid plastic skin or modern glamour retouching."
What Can AI Rebuild in Faces, Hair, and Clothing?
AI can often improve structures that already exist in the scan, especially eyelid edges, lip contours, hair separation, eyebrows, suit lapels, lace, collars, and the boundary between the subject and the background. It is strongest when the original image has soft but visible detail rather than total blur.
The model may also improve local contrast in fabric, restore a clearer hairline, and reduce low-contrast haze from old paper or glass-framed scans. However, it is estimating detail from patterns. That means restored texture should be treated as a plausible reconstruction, not a perfect record of every original hair strand or fabric thread.
Where Are Restored Old Portraits Used in Real Life?
- Reprinting a grandparent portrait for a sibling, parent, or family wall.
- Preparing a clearer image for a memorial card, funeral program, or remembrance slideshow.
- Cleaning up a yearbook or reunion-board headshot scanned from an old page.
- Restoring a wedding, military, graduation, or passport-style studio portrait.
- Improving a cropped face from a group photo when no better individual portrait exists.
- Digitizing family albums for cloud archives, genealogy projects, or printed photo books.
- Creating a high-resolution file for canvas prints, framed gifts, or anniversary keepsakes.
- Making a social post feel respectful and recognizable without over-modernizing the person.
When Will AI Portrait Restoration Not Match the Original?
- Severe motion blur cannot be fully reversed because the original edge information is smeared across the frame.
- Tiny faces under about 400 pixels tall usually restore poorly because there are not enough pixels for reliable facial reconstruction.
- Heavy JPEG compression can leave blocky artifacts that survive denoise and deblur passes.
- Missing emulsion, mold, deep creases, tears, and water damage often need manual retouching before or after AI restoration.
Related guides for restoring old photos
Frequently Asked Questions
AI can often improve mild to moderate blur by rebuilding facial edges, reducing haze, and improving contrast. It cannot perfectly recover detail that was never captured or was destroyed by motion blur, damage, or low resolution.
Scan old portraits at 600 DPI for most prints and 1200 DPI for very small photos. Save as PNG or TIFF to avoid adding JPEG compression before restoration.
Use gentle deblur, light denoise, and small contrast adjustments while comparing the result to the original at 100% zoom. Avoid settings that invent eyelashes, change the mouth, or smooth away real skin texture.
Skin looks fake when denoise, face enhancement, or sharpening is pushed too far. Preserve some grain, wrinkles, freckles, and tonal variation so the portrait still looks like a real printed photograph.
No, start with the cleanest unsharpened scan. Sharpening first can create halos and false edges that AI may treat as real facial detail.
Yes, if the phone photo is sharp, evenly lit, and taken straight-on without glare. A flatbed scan is usually better, but a careful phone capture can work for quick sharing or small prints.
Yes, AI restoration works on black-and-white and sepia portraits. Keep the original tone unless you intentionally want colorization, because colorizing can change the historical feel of the image.
Export a high-resolution PNG or TIFF for printing and archiving, then create a smaller JPEG for texting, email, or social media. Keep the untouched original scan as a separate master file.
AI restoration is a plausible enhancement, not a perfect reconstruction. It can make a portrait clearer, but fine details such as hair strands, catchlights, and fabric texture may be estimated by the model.