How to Whiten Teeth in a Photo With AI
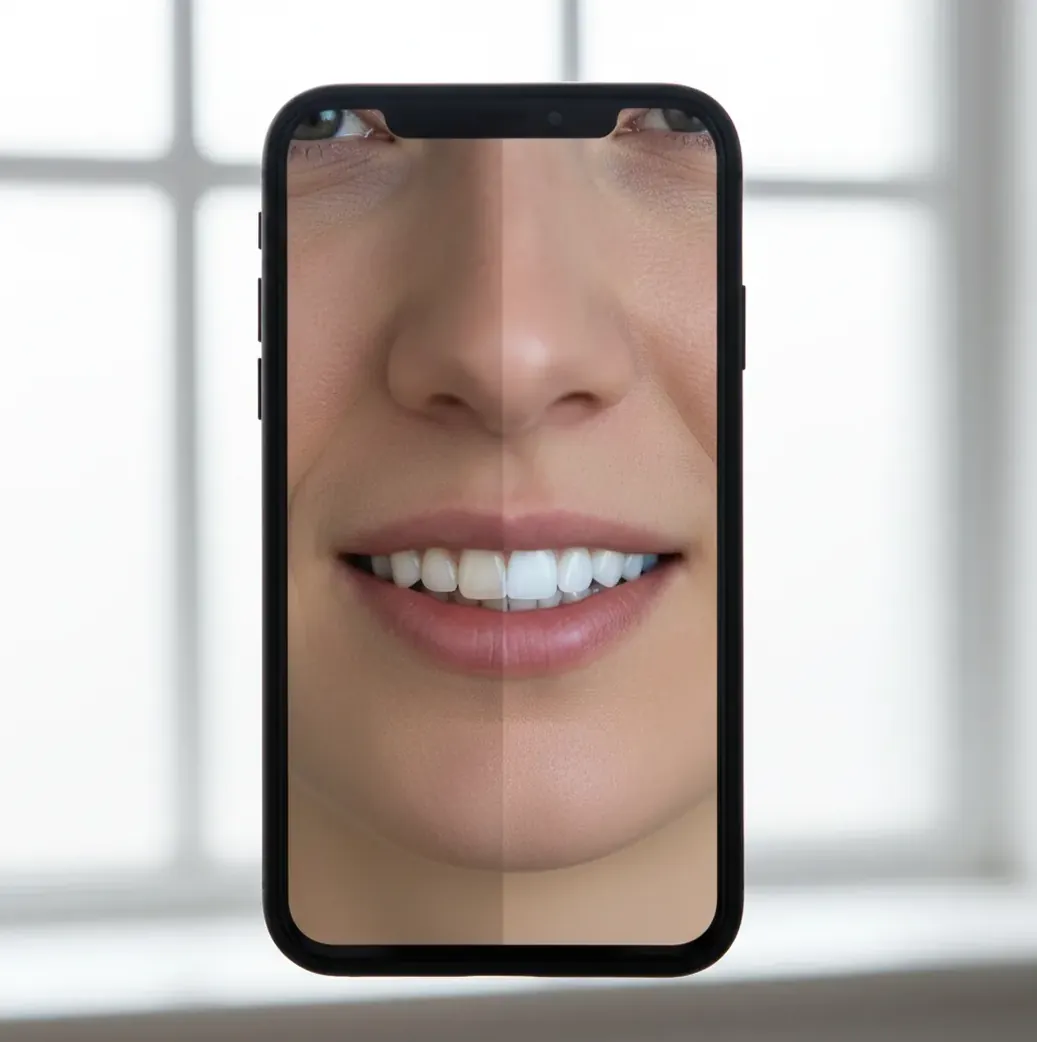
AI can whiten teeth in a photo by detecting the smile area, reducing yellow or orange color casts, and slightly increasing brightness. The best result looks like corrected lighting, not cosmetic bleaching: teeth should keep texture, gumline shadows, and natural contrast.
Creating your image...
To whiten teeth in a photo with AI, use a retouching tool that can isolate the teeth area, reduce yellow saturation, and gently lift luminance. Keep the edit subtle, preserve shadows between teeth, and check the gumline at full zoom so lips or gums are not brightened.
What Is AI Teeth Whitening in a Photo?
AI teeth whitening is a targeted photo-editing process that identifies teeth in a portrait and applies localized color correction. It usually lowers yellow or orange saturation, raises brightness slightly, and preserves tooth texture so the smile looks cleaner without changing the entire face.
This edit is useful when teeth look warmer than they are in real life because of indoor lighting, coffee shop lamps, flash, phone white balance, or nearby colored surfaces. It changes pixels, not actual dental shade, so it should be treated as cosmetic retouching for selfies, headshots, social posts, prints, dating profiles, and creator thumbnails.
How Does AI Whiten Teeth Without Changing Skin Tone?
AI teeth whitening works by combining face detection, mouth localization, and semantic segmentation. The model predicts a mask around the teeth, separates that region from lips, gums, tongue, and skin, then applies color adjustments only inside the masked area.
The actual correction is usually a mix of lower yellow saturation, higher luminance, controlled white balance, and local contrast preservation. Good tools avoid pushing pixels to pure white because real teeth contain shadows, enamel texture, and edge falloff. If the mask is inaccurate, the edit can create bright gums, white lipstick edges, or a flat sticker-like smile.
How Do You Whiten Teeth in a Photo With AI?
Choose a clear smile photo
Start with an image where the teeth are visible, not heavily blurred, and not hidden behind extreme shadow. AI masking works best when the mouth area has enough resolution and contrast.
Fix exposure and white balance first
If the whole image is too warm or underexposed, correct the global lighting before whitening. This prevents you from overcompensating with a heavy teeth-only adjustment.
Apply whitening only to the teeth
Use an AI retouch tool or brush-based mask that targets the teeth region instead of the full mouth or face. The lips, gums, and skin should stay unchanged.
Reduce yellow before raising brightness
Lower yellow or orange saturation gently, then add a small luminance lift. This order helps avoid the common gray-teeth effect caused by removing warmth too aggressively.
Check realism at 100% to 200% zoom
Look for halos along the gumline, brightened lips, lost shadows between teeth, or texture that looks smoother than the rest of the photo. Toggle before and after before exporting.
Which AI Teeth-Whitening Tool Should You Use?
| Tool Type | Best For | Strengths | Watch For |
|---|---|---|---|
| Pict AI | Fast browser or iOS smile cleanup | AI-assisted portrait edits, quick teeth whitening, simple export flow | Still check masks around braces, lipstick, and gums |
| Professional photo editor | Headshots, wedding photos, print-ready portraits | Precise brush masks, color channels, layer control, high-resolution exports | Slower workflow and usually requires more manual editing skill |
| Mobile selfie editor | Social posts, dating photos, casual profile images | Fast sliders, face-aware retouching, easy before-and-after previews | Can over-smooth teeth or apply beauty filters to the whole face |
| Free web retouch tool | One-off edits without installing software | Quick access from a browser and simple single-photo workflows | May have lower export quality, watermarks, or unclear data handling |
Choose the tool based on output needs: a 1080px social post can tolerate a lighter workflow, while a printed headshot or portfolio image needs cleaner masks, high-resolution export, and careful edge checking.
What Prompts Create a Natural White Smile?
- Natural correction prompt: "Whiten only the teeth slightly. Reduce yellow tones, keep natural enamel texture, preserve gumline shadows, and do not change lips, gums, skin, or face shape."
- Warm indoor photo prompt: "Correct the warm color cast on the teeth so the smile looks natural under indoor lighting. Keep the result realistic, not bright white."
- Headshot prompt: "Make the teeth look clean and professional for a headshot. Use subtle whitening, preserve tooth separation and shadows, and avoid a beauty-filter look."
- Group photo prompt: "Whiten only the visible teeth of the selected person. Do not alter other people, skin tones, lipstick, or background lighting."
- Braces-safe prompt: "Lightly reduce yellow tint on the teeth while preserving braces, metal reflections, brackets, and natural shadows. Avoid halos around hardware."
When Is Teeth Whitening Worth Editing?
Teeth whitening is worth editing when the camera makes a smile look duller, warmer, or more stained than it appeared in real life. The most common cases are restaurant selfies, wedding guest photos, warm office headshots, yearbook portraits, creator thumbnails, dating profile images, and product videos with a talking-head frame.
It is especially useful when the rest of the photo is strong but the smile draws attention for the wrong reason. A small correction can make a portrait feel cleaner, more confident, and more print-ready without changing identity, expression, or facial structure.
What Settings Keep Teeth Looking Realistic?
Realistic teeth whitening usually means a small color correction, not a maximum brightness effect. As a practical rule, reduce yellow saturation first, then lift brightness just enough that the teeth match the eye whites and overall scene lighting. If the teeth become brighter than every other highlight in the face, the edit is too strong.
Keep shadows near the gumline, between teeth, and at the mouth corners. Real enamel is not pure #FFFFFF; it has texture, translucency, and slight warmth. For social posts, check the image at phone size and at 100% zoom. For prints or portfolio images, inspect edges at 200% before exporting.
Where Can AI Teeth Whitening Look Wrong?
- Blurred teeth: motion blur or low-resolution selfies make it harder for the AI mask to find tooth edges.
- Deep shadows: whitening teeth that are mostly in shadow can produce gray patches instead of natural highlights.
- Braces or jewelry: brackets, aligner reflections, grills, and lip piercings can confuse teeth segmentation.
- Strong lipstick: red or dark lipstick increases edge contrast and can create a bright halo if the mask bleeds.
What Should You Edit After Whitening Teeth?
After whitening teeth, review the portrait as a whole instead of stacking more face edits automatically. A clean smile often works best with light exposure balancing, gentle skin-tone correction, eye catchlight cleanup, and background distraction removal rather than heavy smoothing.
For creator content, export versions for the final use: square for profile images, 9:16 for stories or short-form video covers, and higher-resolution files for prints or portfolio pages. Re-check the smile after resizing because a subtle edit at full resolution can look stronger once compressed for social platforms.
Frequently Asked Questions
AI can whiten teeth in many portraits, but it works best when the smile is visible, sharp, and well lit. Very blurry, shadowed, or low-resolution teeth may need manual masking.
Use a subtle teeth-only mask, reduce yellow tones first, and keep shadows between teeth. Avoid pure white brightness because natural teeth still have texture and slight warmth.
Teeth often look yellow because of warm indoor lighting, automatic white balance, flash color, coffee shop lamps, or reflections from nearby surfaces. The camera may exaggerate warmth that was less visible in person.
Gray teeth usually happen when yellow saturation is removed without enough natural contrast or warmth. Lower the whitening strength and preserve highlights, shadows, and enamel texture.
AI can sometimes whiten teeth with braces, but brackets and metal reflections make masking harder. Use a lighter adjustment and inspect for halos around the hardware.
Fix overall exposure and white balance first, then whiten the teeth. Correcting the full image first helps the teeth edit match the scene instead of looking pasted on.
Yes, if the editor allows person-specific selection or masking. Make sure the adjustment does not spill onto nearby faces, lips, or gums.
For a headshot, the best whitening is usually subtle: clean enough to remove yellow cast, but not brighter than the eye whites or facial highlights. The smile should look professionally lit, not bleached.
Basic teeth whitening should only adjust color and brightness, not tooth shape. If a tool changes tooth size, alignment, or gumline shape, that is a stronger cosmetic retouch and should be used carefully.